If there's one thing you should know by now based on the information we discussed in the first part of A/B Testing for Native Ads, it's that there are a lot of elements in a native ads campaign that you can (or should) test!
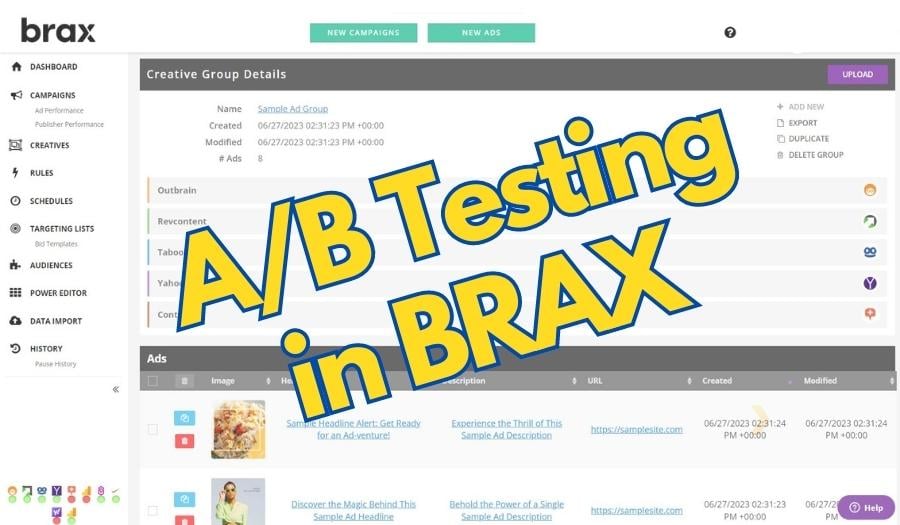
However, the more tests you launch, the harder it is to create and even track.
Don't fret! This is exactly where tools like Brax can make your life easier. Let's start by answering one of your burning questions: what is Brax?
What is Brax?
In a nutshell, Brax is a groundbreaking solution for managing and optimizing high-performance native advertising campaigns without any hassle.
Its user-friendly interface and advanced analytics cater to both newcomers and seasoned marketers alike. The platform streamlines the challenging task of running high-volume ad campaigns, helping you achieve better-quality leads for your business.
Thanks to Brax.io, ad professionals and even small to medium-sized businesses can now manage multiple campaigns from one comprehensive platform.
No more switching between different systems — just collect all the necessary data for successful ad campaigns in one place. The platform's scalability also ensures that growing campaigns won't compromise performance or user experience.

With it, marketers can save precious time, resources, and energy, allowing them to concentrate on what matters most — crafting captivating content and generating an impressive ROI.
In today's fiercely competitive digital world, having a platform like Brax on your side could be the secret to unlocking your native advertising campaigns' full potential and achieving unparalleled success.
If you want to see a demonstration of how the platform can help you, book a free demo today and see it all in action.
How Brax Can Help You with A/B Testing
The platform offers a range of features that make it easier than ever to achieve better ad results. Check out these key benefits that Brax brings to the table when it comes to A/B Testing:
-
Easy multi-variate testing setup
We simplified the process of setting up A/B tests for native ads. You can create multiple ad variations in just a few clicks. Imagine creating a hundred variations in as little as five minutes. No, I'm not exaggerating!
-
Efficient audience targeting
Our platform's advanced targeting features enable businesses to segment their audience effectively, ensuring that the right ad variations are shown to the right users during A/B testing. Every targeting feature that's available with the native advertising platform will be available here, so it's like setting the ads up in your ad network, except it's easier with us!
-
Keep a finger on the pulse of your tests
The platform's comprehensive reporting features deliver valuable insights into how each ad variation performs during the testing process. This empowers businesses to make well-informed choices when selecting the most effective native ads for their campaigns.
-
Streamlined optimization
Brax allows advertisers and small businesses to quickly implement changes based on A/B test results, helping them optimize their native ads for better engagement and conversion rates. As soon as you identify high-performing ads, you can increase their bids. As soon as you see low-performing ads, you can immediately pause them — all within Brax's dashboard. You can even automate this task (which we will discuss later)!
-
Seamless integration
Brax seamlessly integrates with multiple native ad platforms, making it easy for advertisers and small businesses to run ads across different channels all in one place. No more switching from one tab to the next and comparing how the ads are performing.
Now that we know that Brax can definitely handle everything we need when it comes to A/B and multi-variate testing, the next question is — how do we do it?
How to Set up Native Ads Testing in Brax
Now it's time to embark on the exciting journey of setting up native ad testing in Brax!
Setting up native ads testing in our platform is like hitting the open road on a sunny day — smooth and full of potential. So, grab your sunglasses, and let's ride into the world of native ads testing, where we'll fine-tune your advertising machine for peak performance.
To get started, first set up a campaign for the network of your choice.
Campaign Creation in Brax
Crafting campaigns in Brax is a breeze, and you'll be amazed at how effortlessly you can bring them to life.
First, click on the New Campaign button and select the network where you want to run ads in.

The "Create Campaign" form consists of both essential and optional fields, and what's available depends on the requirements of your ad network.
Don't worry about filling up the wrong fields since the form will only show fields that you need to add information to, depending on the network you initially chose.
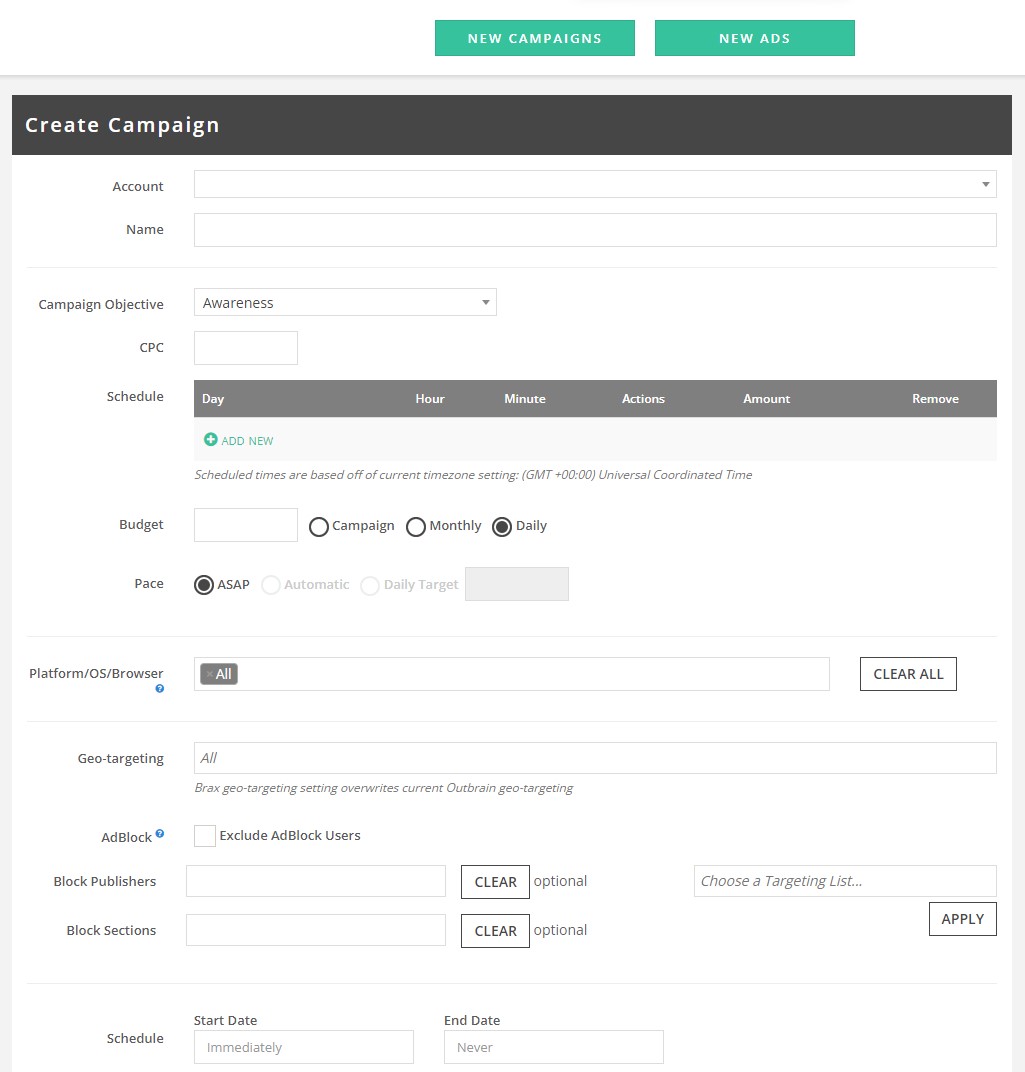
Here are some fields that you may be asked to fill out:
- Account
- Name
- Branding
- CPC
- Spending Limit
- Ad Delivery
- Devices
- Bid Type
- Targeting Type
Bear in mind that the mandatory fields can differ depending on the ad network you select. While certain fields are optional, we strongly recommend refining your campaign settings to optimize their chances of success.
Once you've crossed all the T's and dotted all the I's, hit "Save." Your masterpiece of a campaign is now being created and sent to your chosen ad network. With the campaign groundwork laid, it's time to roll up your sleeves and create some show-stopping ads!
Creating Multiple Ad Variations
Creating a smorgasbord of ad variations has never been easier with Brax! You can cook up to 100 ads in one go and fine-tune them right within the platform.
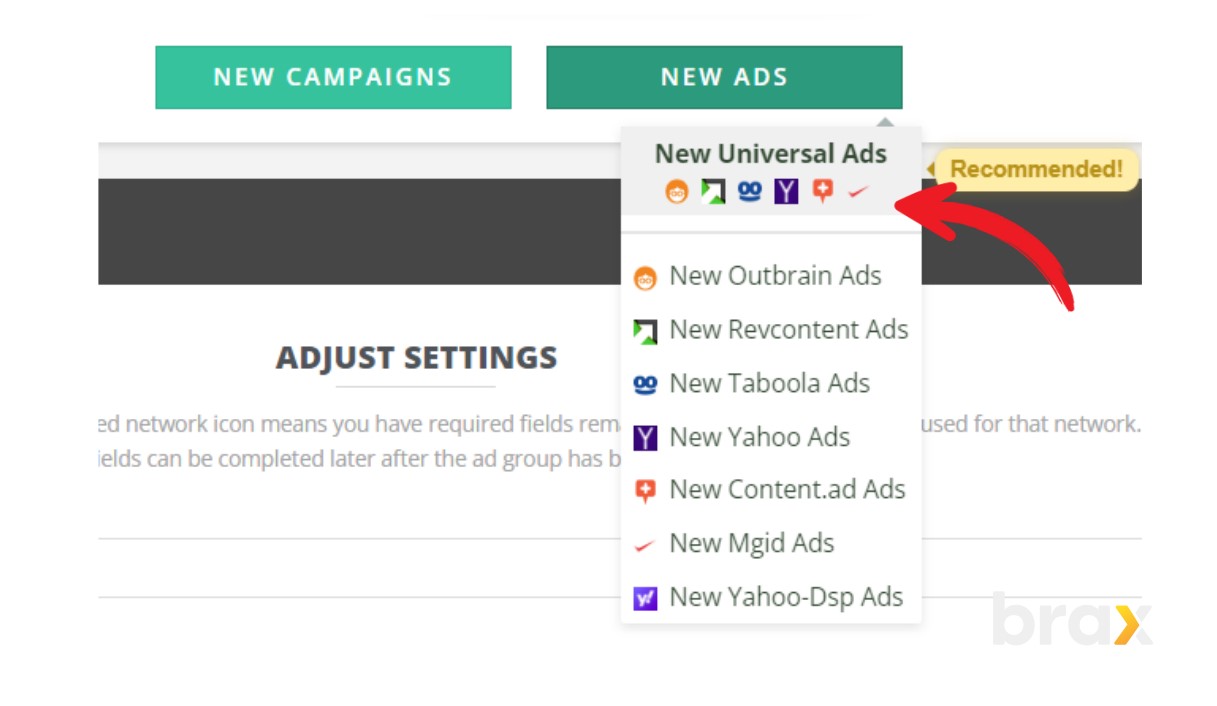
Click the "New Ads" button at the top of your screen and choose the appropriate ad network. Again, keep in mind that there might be minor differences when creating ads for various networks.
For now, let's choose Universal Ads so we can make a single ad for multiple networks in one go.
Let's break down the main steps.
Whipping up Ad Data
-
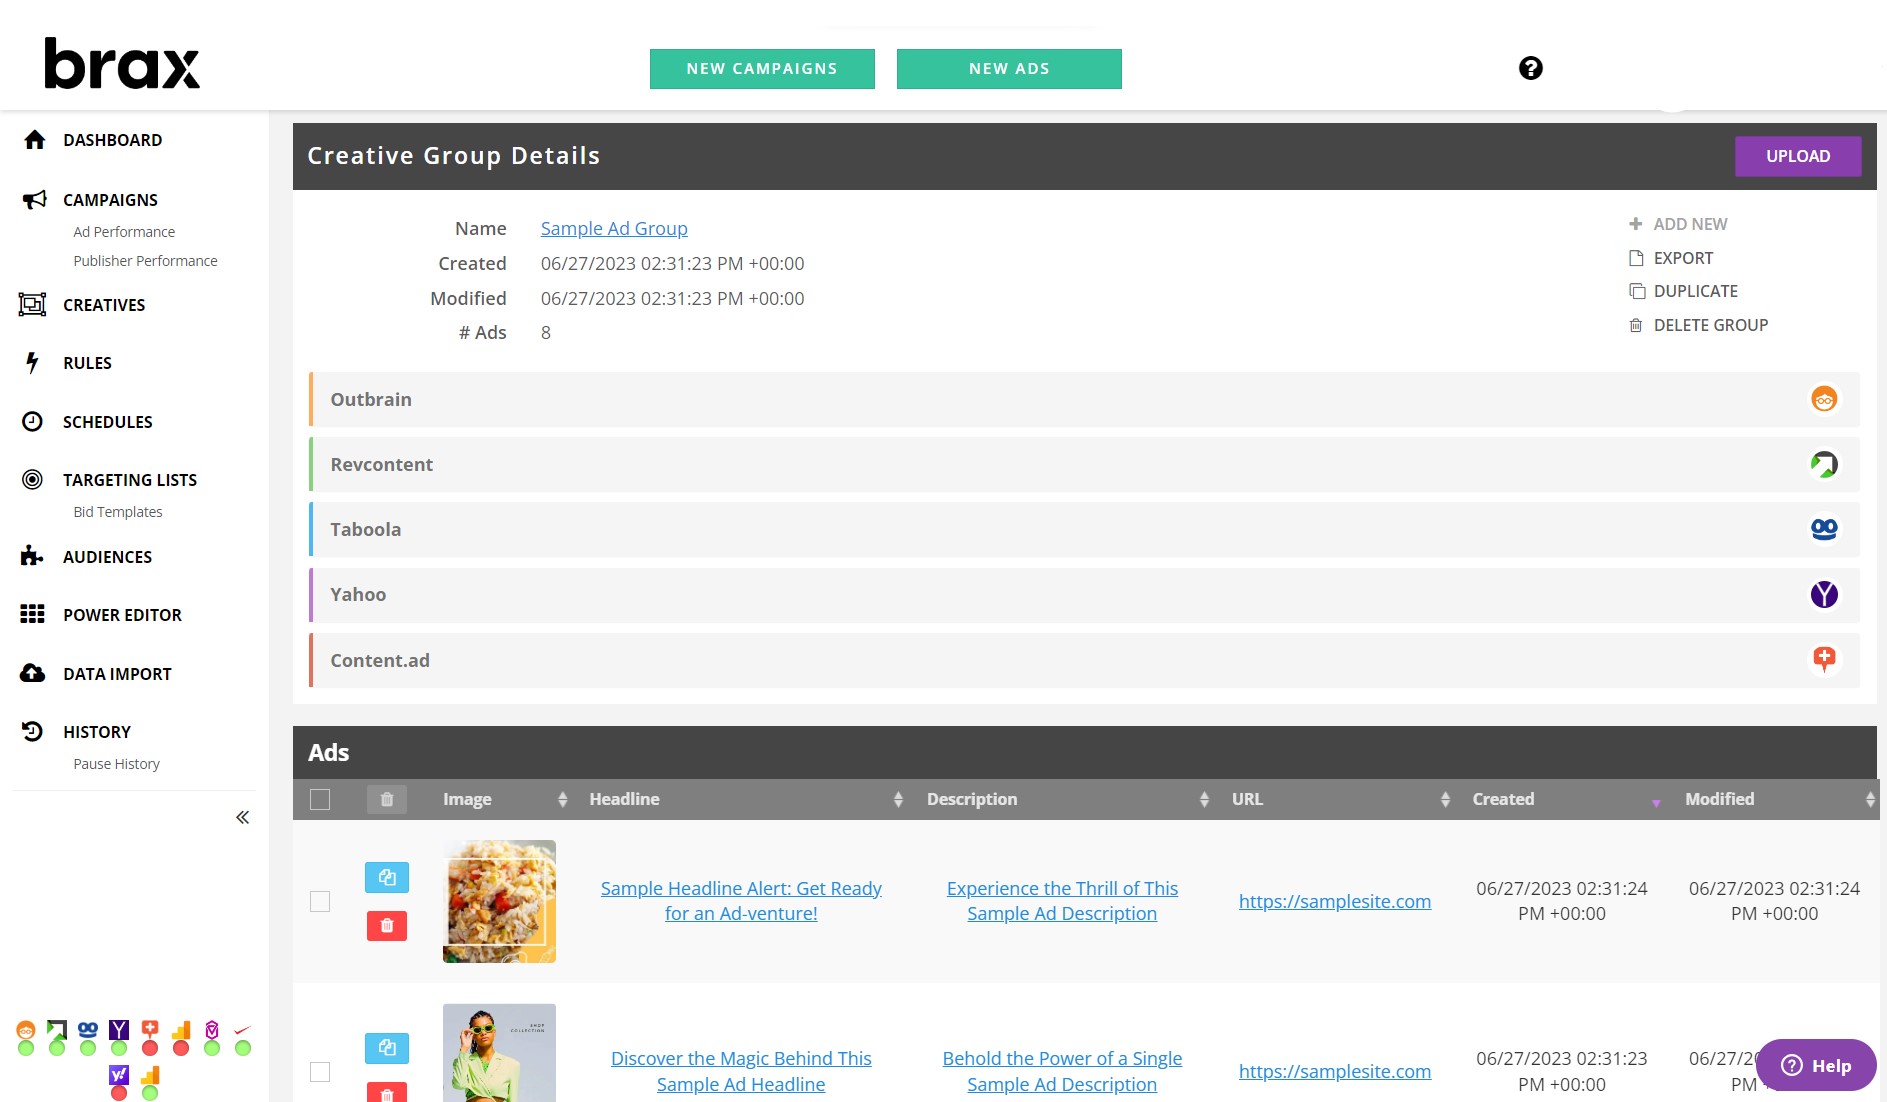
Creative Group Name
This will be the name of the Creative Group displayed in Creatives after saving it. -
Destination URL
This is where all your ads will direct users. Remember, you can edit individual ad URLs later. Make sure each URL starts with http:// or https://. -
Tracking Code
The Tracking Code should already be filled out. If not, enter your Ad Level Tags here, and set up Ad Tag Defaults before creating another campaign. -
Brand
This is the text displayed below the ad, often the name of your site. -
Content Type
Choose from Article, Mobile App, or Video.
Crafting Captivating Ad Titles
Now this is where the magic happens!
Input your headlines or paste a list directly from Excel. Add up to 10 titles using the "Add More Headlines" button.
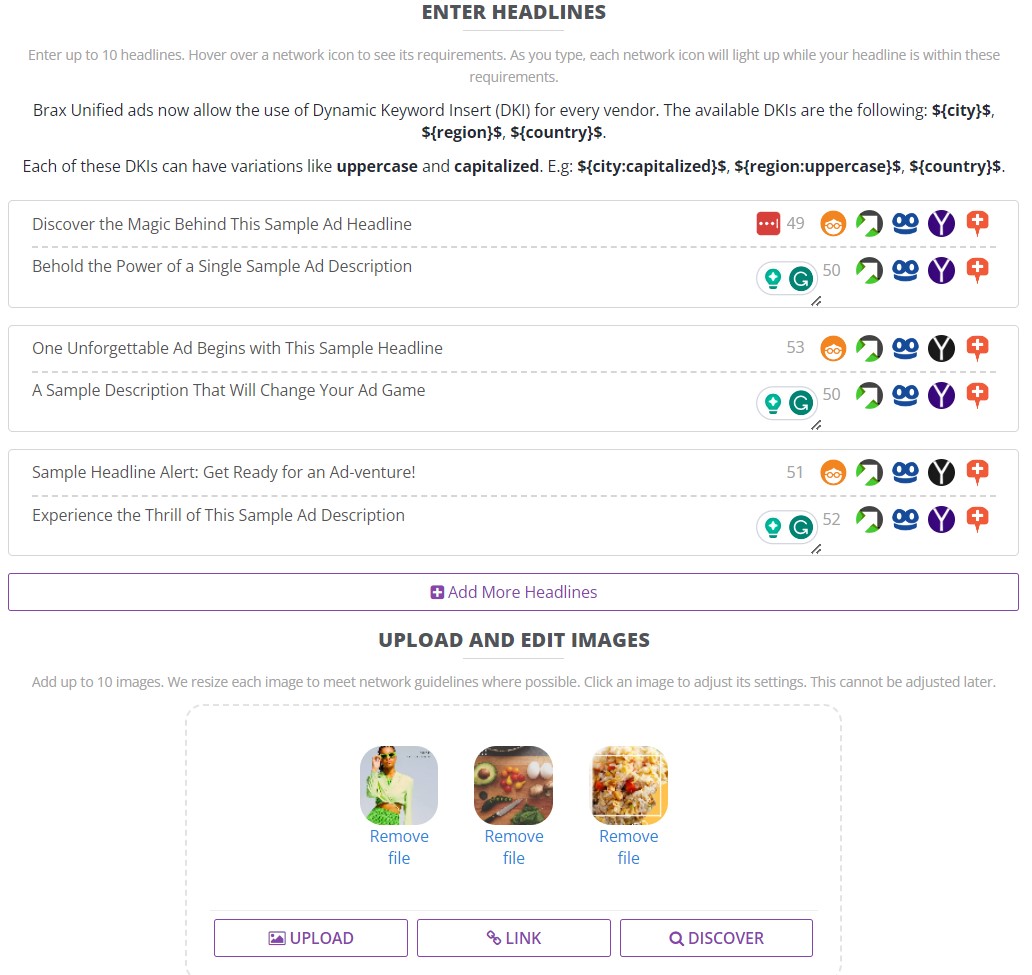
Image Upload Extravaganza
Drag and drop up to 10 images into the box or click Upload to search for them. Alternatively, click "Link" to paste web-based images. You can also click on "Discover" to find free images from Pexels and Unsplash.
To remove an image, hover over it and click Remove File.
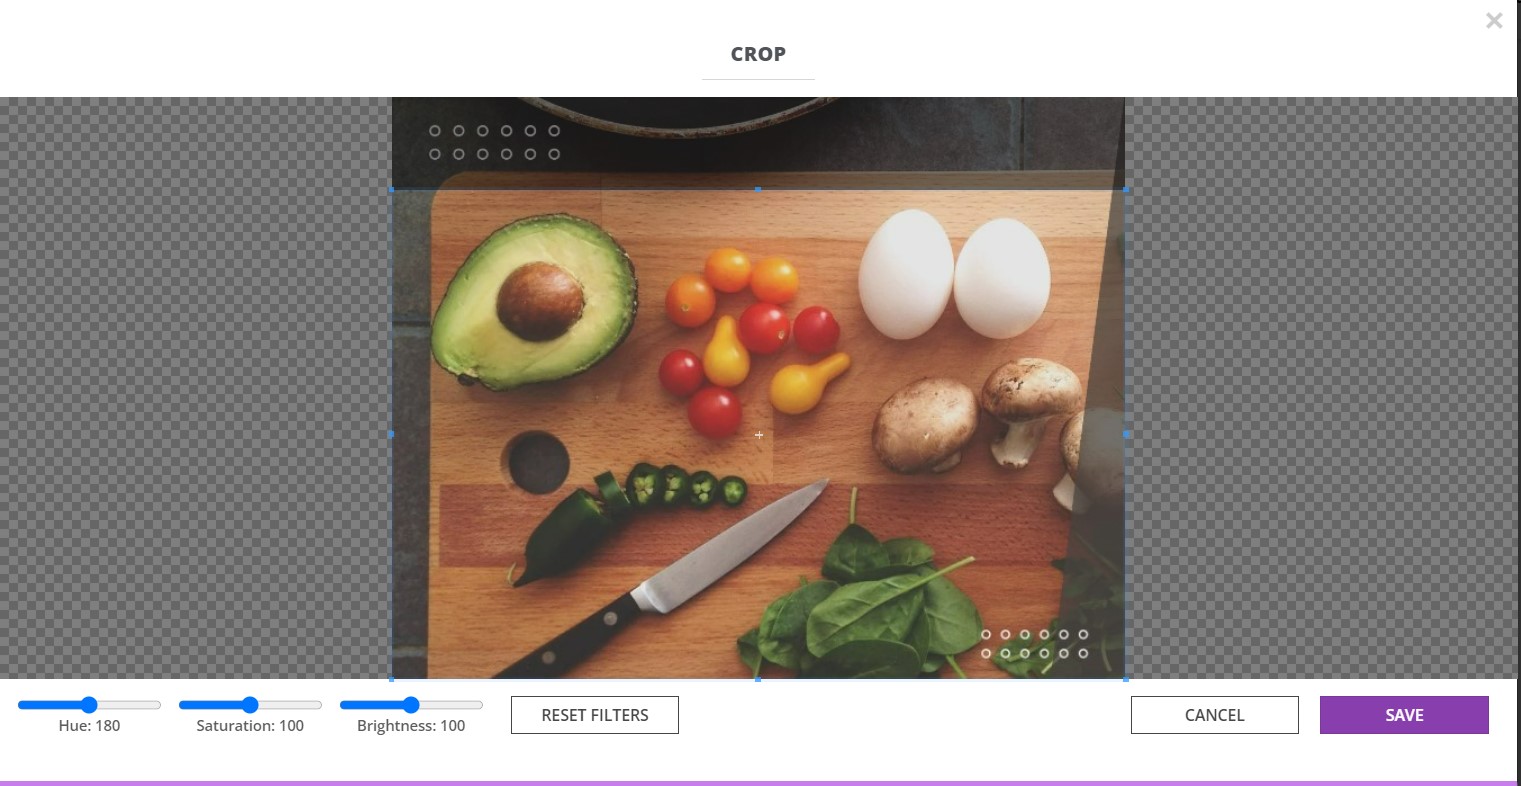
Click on an image and choose the one under a specific network to edit it directly in Brax. You can crop, resize, and adjust hue, saturation, and brightness to create a visual feast. Once you're satisfied with your masterpieces, hit save.
You can add up to 10 images.
Check and Select Ad Combinations
Each title you add will automatically pair with each image. So if you create 10 titles and add 10 images, you'll create 100 delicious ad variations!
To see how they look, scroll down and check the Review section, where you will have a preview of how your ads will look once it's live.
To exclude a specific image/headline combo, click on it in the preview section for the X mark to come up. Click on this X mark to delete the ad.

If everything looks good, click "Continue". You can either send the Creative Group to a campaign by clicking "Upload" or leave it for later. Click "Save" if you're not sure when you want to send them to the ad network but would want to save your progress.
And that's it! Your campaign and ads are ready to serve up traffic as soon as you've uploaded them and they're approved by your ad network.
Viewing the Performance of Your Ad Variations
Grasping the art of efficiently tracking your campaigns is vital for pinpointing successful strategies and areas for improvement, so Brax made it easier for you to do that. To view campaign data, just click on "Campaigns" and then select the campaign you want to analyze.
Since the dashboard is an essential tool, let's explore the various features and functionalities it offers.
1. Select the Date Range
Click on the date located in the top-right corner to choose the desired date range for which you wish to view data. Don't forget to hit "Apply" after making your selection.
If your recently created campaign isn't showing up in the report, chances are you haven't included the current date or your Brax dashboard's time zone is different from your own. If it's the latter, you can change this in the account settings.
Note that "Last 7/30 days" does not include today's data. If "Today's numbers" show 0, it's because the timezone of your connected traffic sources is a day behind. Some traffic sources, like Taboola, allow you to change this. Brax updates its data hourly.
You can also click on specific campaigns to view the actual ad creatives and the performance of each.
2. Choose Desired Columns or Data to View
Columns are the foundation of your data so each campaign in Brax has a row with multiple columns, including important metrics like impressions, clicks, CTRs, ROI, and even KPIs. You can customize the order of your columns by dragging the column headers.
To select which columns you want to display, click "+ Columns" on the filter taskbar.
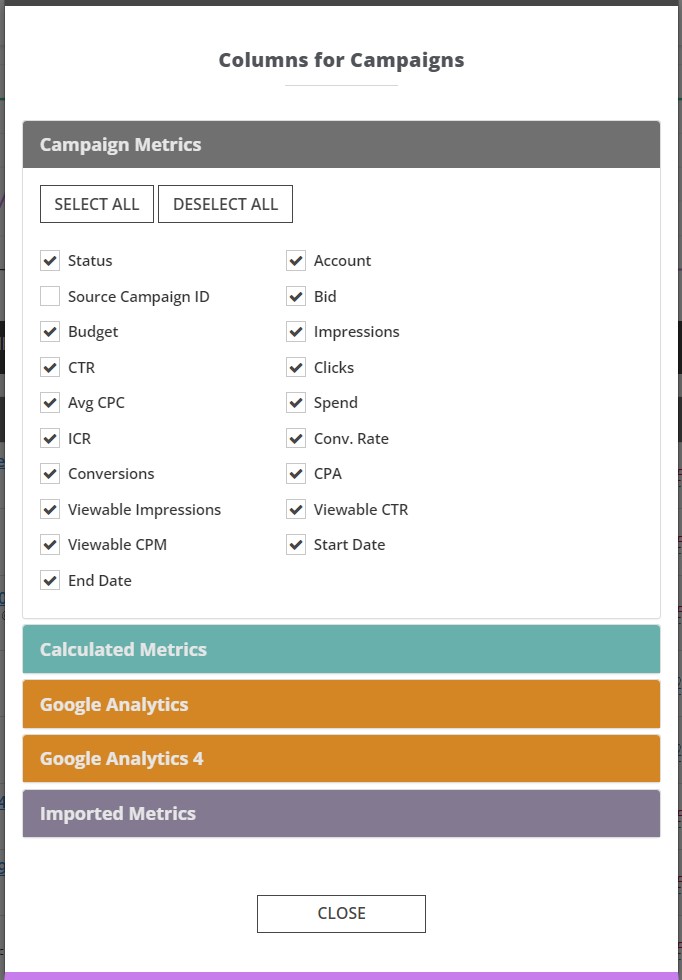
You can also add to your columns Google Analytics data or Voluum data, if you have these. If you've create custom metrics, click on Calculate Metrics to show them.
Read our article on Custom KPIs and Conversion Metrics for information on how to set up calculated metrics.
To sort your data, click any of the arrows next to a column header. To return to the default sorting, sort by spend or refresh your screen.
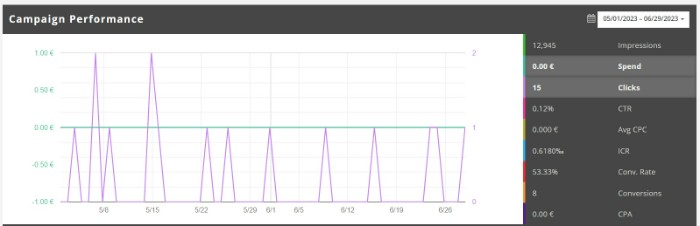
3. Evaluate the Performance of Your Campaigns
For a quick evaluation of ad performance, the graph is very handy. Just select the data that you want to evaluate and the date range so you can identify trends.
Optimizing Your Campaigns
Now after seeing the data and evaluating the performance of your A/B test, it's time to learn how to optimize your campaigns. Here are some of the basic actions you can do on the platform.
Anything you do here will quickly be implemented into your ad network account.
Running your ads is a walk in the park with our user-friendly controls. You can easily kick-start or halt existing creatives by hitting the pause (❚❚) or play (►) buttons. This allows you to steer your campaigns at your convenience.
Looking to delve deeper into your campaigns? The Campaign Manager has got all the advanced options you need.
By clicking on any campaign name, you'll be able to unlock this power-packed tool. Here, you can monitor day-to-day performance, manage your ads, block certain publishers, and so much more.

To pause or activate multiple creatives or campaigns in one go, simply tick the checkboxes beside these buttons and perform the operation at once.
Tweaking your budgets and CPCs is also a breeze. On the main campaign page, have a look at important details about the campaign right above the graph.
Here, you can tweak the campaign CPC, the monthly budget, and the daily target of the entire campaign.
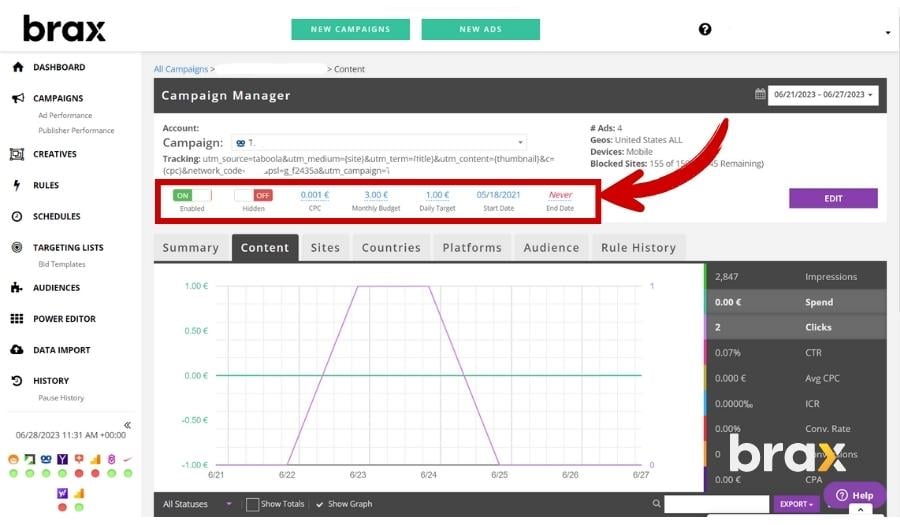
We've got your back in case of slip-ups, so our platform will alert you if there's an unusually high CPC to prevent accidental placements. If the hefty increase is deliberate, just accept the change and move forward.
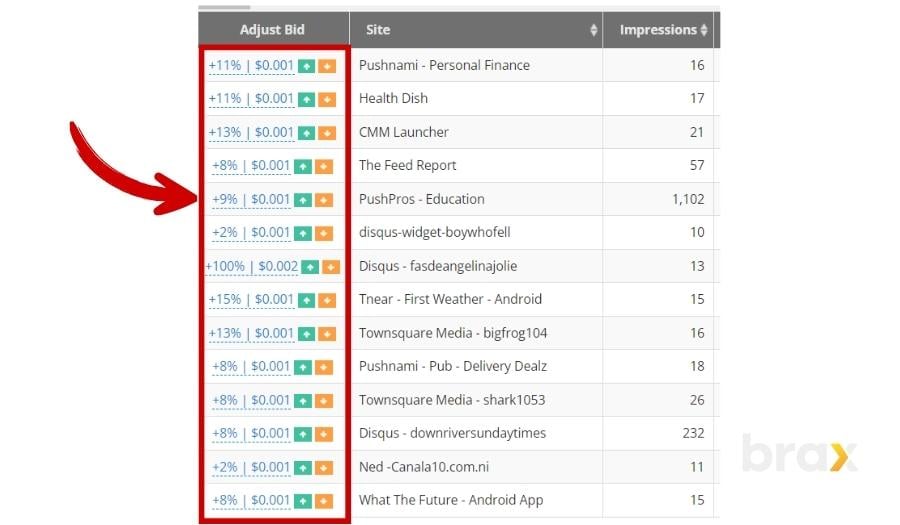
Now, if you'd like to check the performance of specific sites, click on the Sites tab.
Here, you'll find stats per publisher or site, such as impressions, clicks, and CTR. You can also make manual adjustments to bids (either by percentage or dollar amounts).
It is also possible to pause and activate specific websites by clicking on the pause (❚❚) or play (►) buttons right next to each one.
Lastly, we know how crucial productivity is when managing your campaigns. That's why duplicating a campaign is a feature we offer. It's a fantastic way to maximize efficiency. Check out our user guide to learn more about duplicating a campaign.
Using Rules for Automatic Optimization
When it comes to A/B testing of ads, many optimization tasks are routine — which means these are tasks that you already have an established set of metrics that help you decide on what action to take.
For example, if a publishing website has shown your ad at least two thousand times (2,000 impressions) and has not gathered a single click over the last three days, your typical action would be to pause that source.
Now these are very mundane tasks, aren't they?
But what if we tell you that there's an easier way to perform these optimizations, and they can be done with just a few clicks in Brax? That is through Rules-Based Optimization.
Think of Rules-Based Optimization as your personal assistant for optimizing A/B testing of ads. Just like an assistant who knows exactly when to schedule your meetings or when to hold your calls, this feature works based on the rules you set.
Each rule is a simple combination of an 'Action' and 'Criteria'. The 'Action' is akin to the task you assign, and the 'Criteria' is the specific situation in which you want the task to be performed.
How to Create Rules
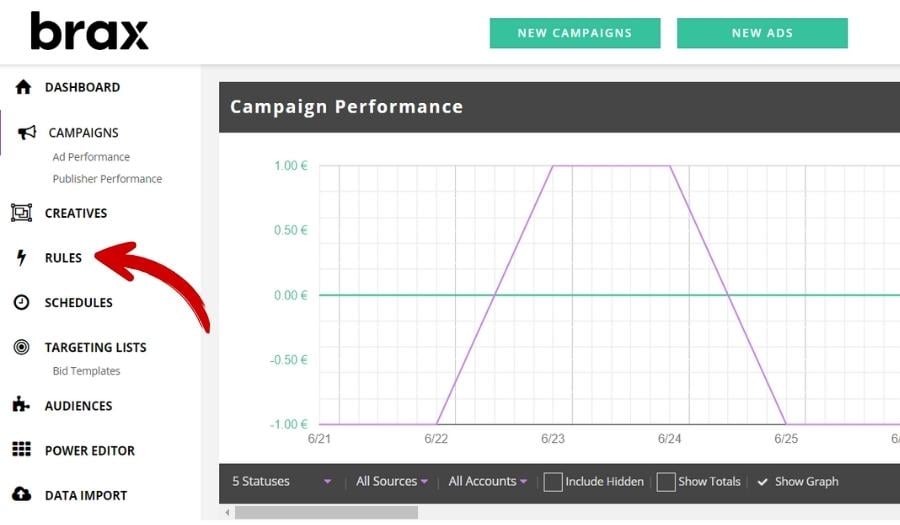
First off, head over to the 'Rules' page. This is your main hub for everything rule-related. It's like your assistant's office where you can assign new tasks, review existing ones, or take a look at completed tasks in the 'Rule History'.
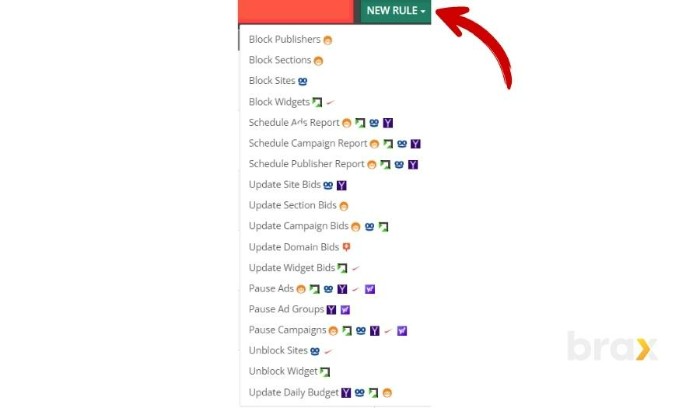
Ready to employ a new assistant? Click on 'New Rule', and select the 'Action' you want to assign. Think of it as defining your assistant's job role.
Your assistants are multi-taskers. They can perform campaign optimization actions across multiple accounts, traffic sources, and campaigns, and automate this process using the Brax API.
From blocking publishers, sections, and sites, to updating bids, each rule is like a unique skill. Here's a quick rundown of the types of rules available:
-
Block Publishers
Think of this assistant as a gatekeeper, preventing certain publishers from displaying your ads. This can only be applied to Outbrain campaigns. -
Block Sections
This assistant specializes in blocking specific sections of a site. This can only be applied to Outbrain campaigns as well. -
Block Sites
This one keeps your ad away from entire websites. This is applicable to Taboola campaigns only. -
Block Widgets
This is for blocking native ad spots in Revcontent and MGID. -
Schedule Ads, Campaigns, and Publisher Report
This reporting rule applies to Outbrain, Revcontent, Taboola, and Yahoo Gemini. -
Update Site Bids
This one is for adjusting the bids per individual site. This is applicable to Yahoo and Taboola campaigns only. -
Update Section Bids
Similar to above, except this one is for Outbrain alone. -
Update Campaign Bids
This is for adjusting the bid for the entire campaign, whether it be in Outbrain, Taboola, or Revcontent. -
Update Widget Bids
This is to adjust the bids per native ad spot in Revcontent and MGID campaigns. -
Pause Ad Groups
This allows you to deactivate ad groups running in Yahoo. -
Pause Ads or Campaigns
These two have the power to halt ads or campaigns in any native ad network in our platform. -
Unblock Sites
This is for reactivating previously blocked sites. It is typically used when advertisers want to expand their reach but do not want to keep getting traffic from the same sources, hence these sources have been "limited" by blocking them for a time. This is applicable to Taboola and MGID campaigns. -
Unblock Widget
This is similar to the one above, except this one is meant for Revcontent campaigns. -
Update Daily Budget
As its name implies, this is to automatically adjust the daily budget upon reaching a specific criterion. This allows advertisers to better manage their finances. Applicable only to Yahoo, Taboola, Revcontent, and Outbrain campaigns.
Next up, set the criteria — the specific situation that will trigger your assistant into action. For instance, I chose to create a rule that pauses ads with the following criteria: if Campaign Spend is more than $100 and Ad Spend exceeds $50 over the last 7 days, my "assistant" gets to work!
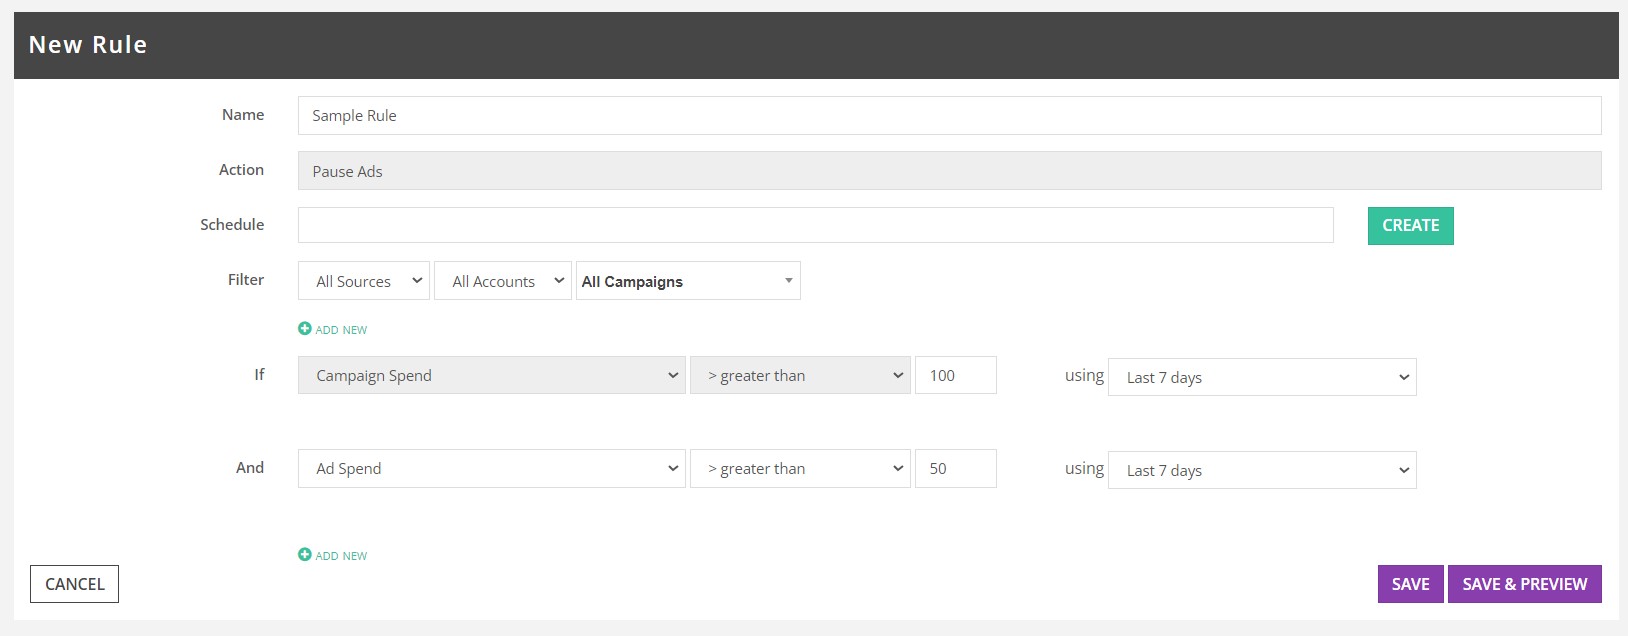
Before your assistant rolls up their sleeves and gets started, hit 'Run' to preview their actions. It's like a trial run to ensure everything works according to plan. Once you're satisfied, click 'Confirm' to finalize your settings.
Every task your assistants complete is recorded in 'Rule History'. You can view this from the Rules page or the Campaign Manager, giving you a clear overview of which rules have been executed for a specific campaign.
Scheduling When Your Rules Should Run
To make things even more convenient, rules can be scheduled to run automatically, like setting reminders for your assistant. You decide when and how often each rule should be executed, giving you complete control over your campaign optimization.
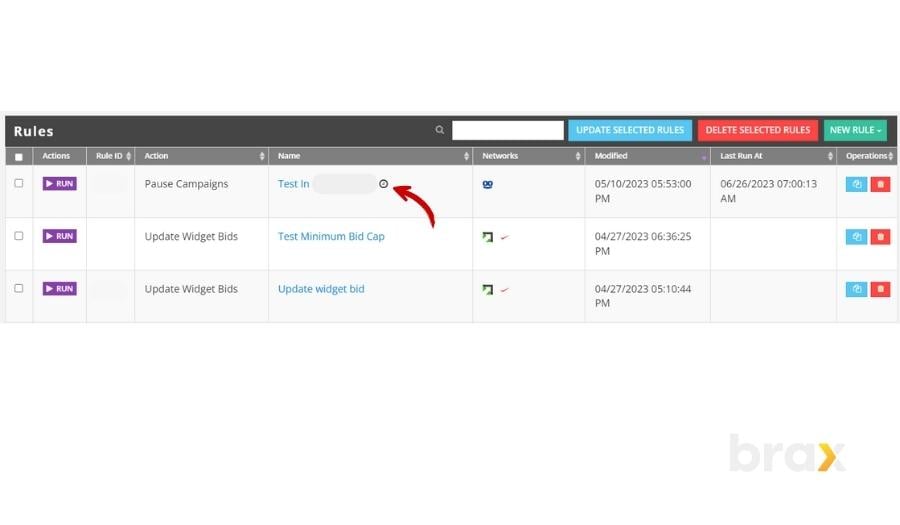
You can tell if a rule is on a schedule by looking for a small clock icon next to the rule's name. To manage schedules, click 'Schedules' in the left sidebar. You can also create a schedule while creating or editing a rule, and attach the new schedule to existing rules.
Go to the Schedules page by choosing "Schedule" on the main menu, then clicking on the "New Schedule" button.
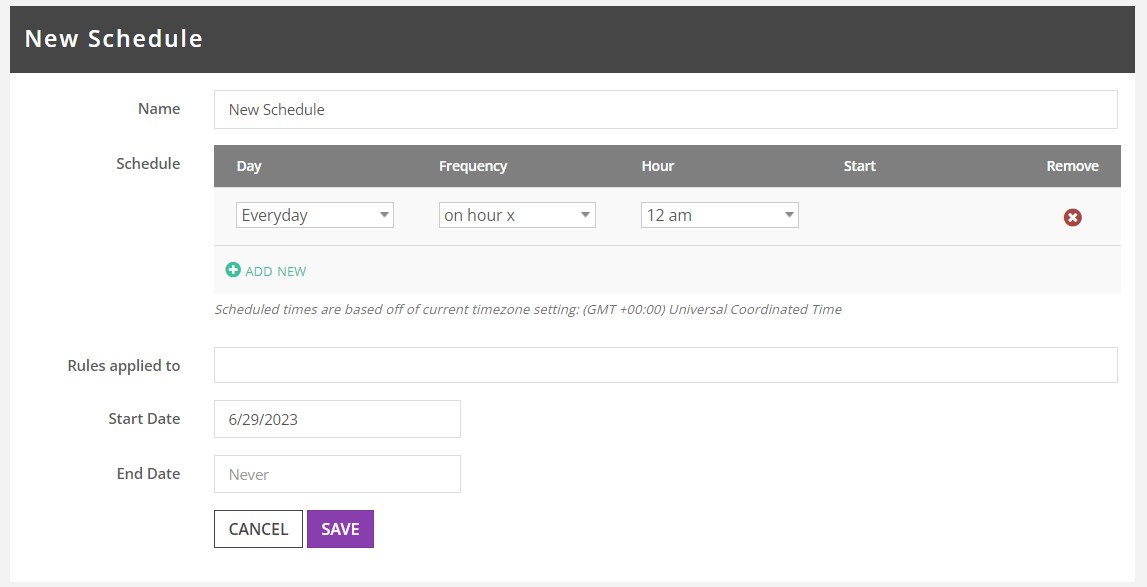
A schedule is how often you run a specific rule, so keep that in mind when creating one.
In the Schedule Creation page, fill out important details such as name, schedule, and start and end dates.
For the schedule, you can set the frequency or how often you want the rule to run. It could be a specific day, a particular time of the day or it could be every X number of hours.

For the section about "Rules applied to", you can choose a rule that you've previously set, but you can also leave it blank in case you have yet to create the rule with which to apply this schedule to.
Click "Save" and you're done! This new schedule will automatically be enabled.
In a nutshell, with Rules-Based Optimization, managing your campaigns becomes as easy as delegating tasks to a reliable assistant. It not only ensures optimal performance but also saves you time, allowing you to focus on other important aspects of your business.
So, what have we learned?
And there you have it, folks! We've journeyed through the ins and outs of setting up A/B testing for native ads using Brax in Part 2. Together with our comprehensive exploration of multivariate testing in Part 1, you're now equipped with a treasure trove of insights to enhance your ad performance.
The ball is now in your court! Begin setting up your A/B tests and let the power of data lead you to the advertisements that will best meet your objectives.
Remember, the secret sauce to success is the continuous cycle of testing, learning, and refining. Each test takes you one step closer to crafting the perfect ad.
But let's be real here — if all this talk of A/B testing, multivariate testing, and campaign creation sounds like we're speaking in tongues, don't sweat it!
Our dedicated Brax team is always ready to lend a hand. We're more than willing to help you navigate through the labyrinth of advertising needs. No question is too big or small for us, so send us a message!
So whether you're ready to dive headfirst into A/B testing or you're still trying to figure out which way is up, remember — we've got your back. Together, we can turn your advertising goals into reality. Happy testing!

