When it comes to native ads, conversion tracking is essential for success. Without it, your campaigns are just taking random stabs in the dark! Seriously, how else can you know if a user actually took action after engaging with your ad? How do you know what’s working and what needs improvement?
![]()
Conversion tracking takes all the guesswork out of native ad campaigns and gives marketers vital insights into their targets' interests and behaviors. It’s like having insider information that helps you create even more effective ads going forward. So if you’re serious about nailing your next campaign, you need to use conversion tracking to maximize results and bring home the bacon!
But what do you do if you've set up conversion tracking and it doesn't seem to work? In this article, we'll talk about how conversion tracking works, how to set them up in the top native advertising platforms, and how to troubleshoot it if something seems not to work as it should.
Table of Contents
How Conversion Tracking Works
Conversion Tracking in Taboola
Conversion Tracking in Outbrain
Conversion Tracking in Revcontent
Conversion Tracking in MGID
How Conversion Tracking Works
To start off, it's important to understand that the success or failure of any campaign boils down to its ability to convert users into customers. Conversion tracking is a key component in measuring conversion rate performance (CR). Most native advertising platforms provide granular visibility into your campaign performance metrics so you can effectively analyze and optimize campaigns.
Tracking conversions, in the simplest of terms, is a process in which you can understand how effective your online advertising campaigns are. It enables you to track user actions on your website and know how many activities (like clicking a link or adding an item to their cart) are converted into a sale or desired goal.
Conversion tracking is used by savvy marketers to identify weak points in the customer journey and make meaningful improvements, meaning more sales at lower costs! An efficient conversion tracking system should be tailored to meet the needs of the organization that implements it, taking into account its own specific objectives. Hence why conversion tracking can take quite some time to set up — but it's worth it in the end!
With conversion tracking, you don't just monitor the number of conversions but also the conversion rate, cost per acquisition, and so much more. Depending on the kind of conversion you receive, you can even use the data for retargeting customers. There's so much that you can do with the help of conversion tracking!
Conversion Tracking in Taboola
Let’s get into setting up conversion tracking in Taboola. There are actually two ways to set up conversion tracking in this platform, and that's through the Taboola Pixel or through Server to Server (S2S) Tracking.
Setting up the Taboola Pixel
The Taboola pixel helps you track user behavior, such as a click or page view, so you can gain insights into which ad content resonated with visitors. Here are the steps for setting up your Taboola Pixel:
1. Visit the Tracking page in your Taboola dashboard. Click on Create Pixel.
2. On the new page, scroll down to the Pixel Code section. Copy and paste this onto each webpage of your website where you wish to track user activity.
![]()
3. Place it within the <head> element — this ensures that when a user visits a page, their information will be automatically collected and sent to Taboola for measuring engagement across your campaigns.
And you're done! When you receive traffic and conversion on your pages, it should reflect in Taboola.
Preparing S2S Tracking in Taboola
Setting up server-to-server tracking with Taboola may seem like a daunting task, but once you add the {click_id} macro into your tracking URL, it's a breeze. Whenever the user completes a relevant action, such as making a purchase or signing up for a service, your third-party tracking service will match the transaction ID to the click ID, allowing it to attribute the conversion to the click.
Take note that you must set up the postback URL for Taboola so that the conversion information will be fired from your server to Taboola.
Troubleshooting Conversion Tracking in Taboola
Everything should be working by now, but what happens if you get the notice that you're still waiting for traffic even though you know that traffic has already come and gone?
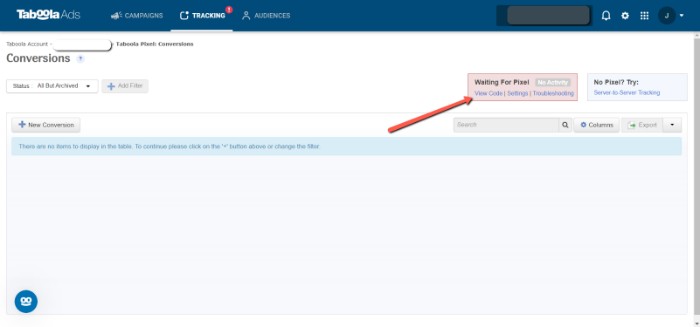
This means there is something wrong with the set-up, or another code or pixel is preventing Taboola's pixel from capturing information. When this happens, what you can do is use the Taboola Pixel Helper.
This Chrome Extension makes troubleshooting super easy and provides great insights into pixel implementation. With its real-time feedback, you can make sure nothing slips through the cracks and your implementations are firing perfectly. It scans for conversion, retargeting, or new pixels and provides feedback on possible errors.
To use this, fire up Chrome and install the Taboola Helper Pixel extension. Then, open the website you need to check, and voila! If everything is correctly implemented, an icon with a small number will pop up in Chrome's top-right corner, indicating the number of pixels found.
Click on it for a report of identified pixels, as well as any implementation errors. The following are common errors that you might encounter:
- No pixel found on the page.
- Invalid account ID.
- There's a Taboola pixel on site, but nothing was fired.
- The pixel was activated multiple times on this webpage. This can cause errors in your event tracking.
- The parameter does not appear to be encoded.
- You left the placeholder in your pixel.
- You didn't remove the curly braces when replacing the placeholder.
- The pixel took [x] seconds to load. Therefore some actions may not be tracked.
With any type of error you encounter, you'll find quick solutions from within the Pixel Helper itself.
Conversion Tracking in Outbrain
Do you want to be able to see what truly delights your visitors and what might need tweaking on your website? Outbrain offers an eye-opening solution with its pixel tracking tool. There are two ways to set this up: by copying and pasting the Outbrain pixel code and by using the Google Tag Manager.
Manually Adding the Outbrain Pixel
If you want to set it up manually, simply head over to the Conversions tab. You'll see the 'Install Pixel' button located in the upper right corner.
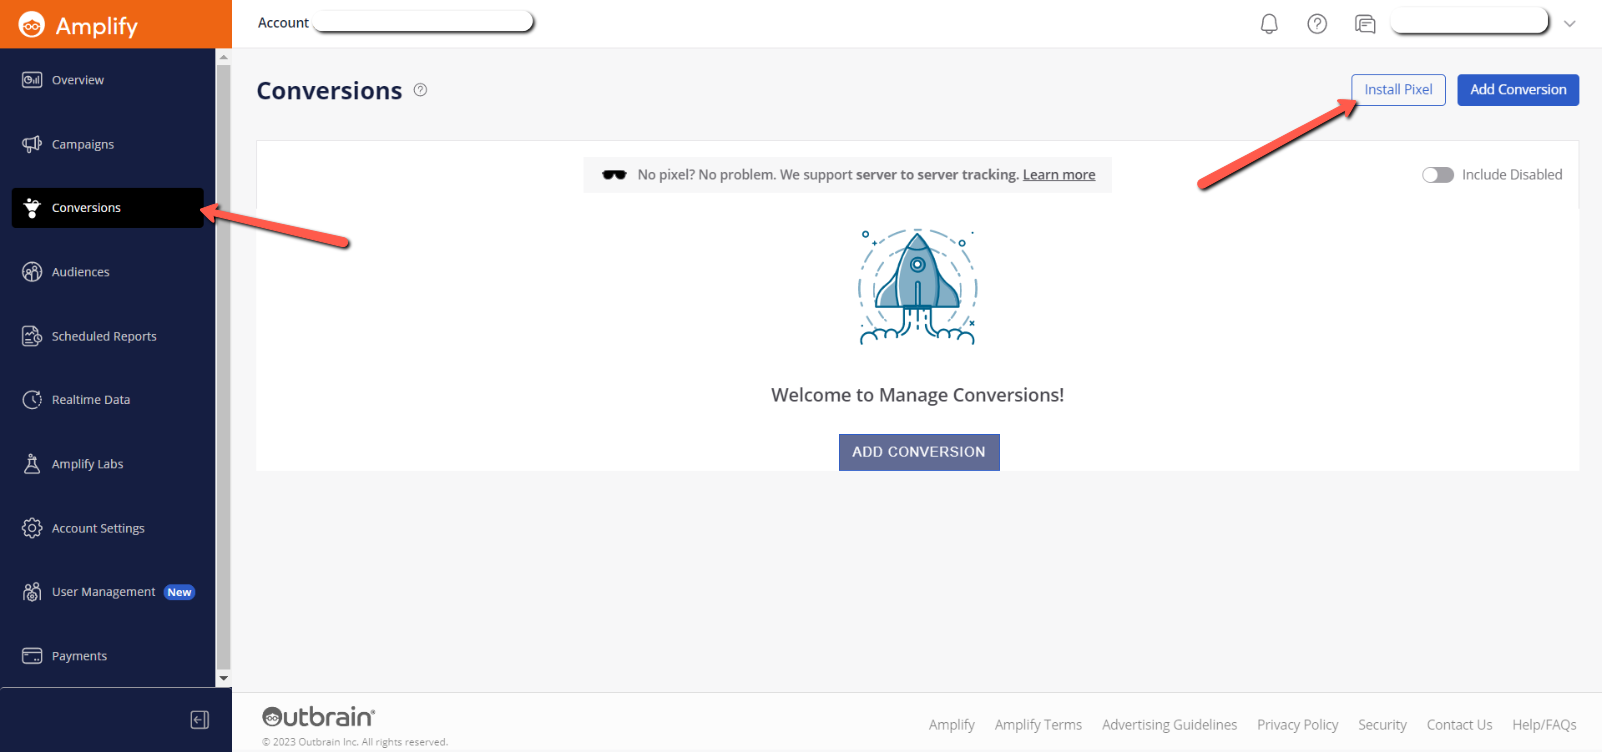
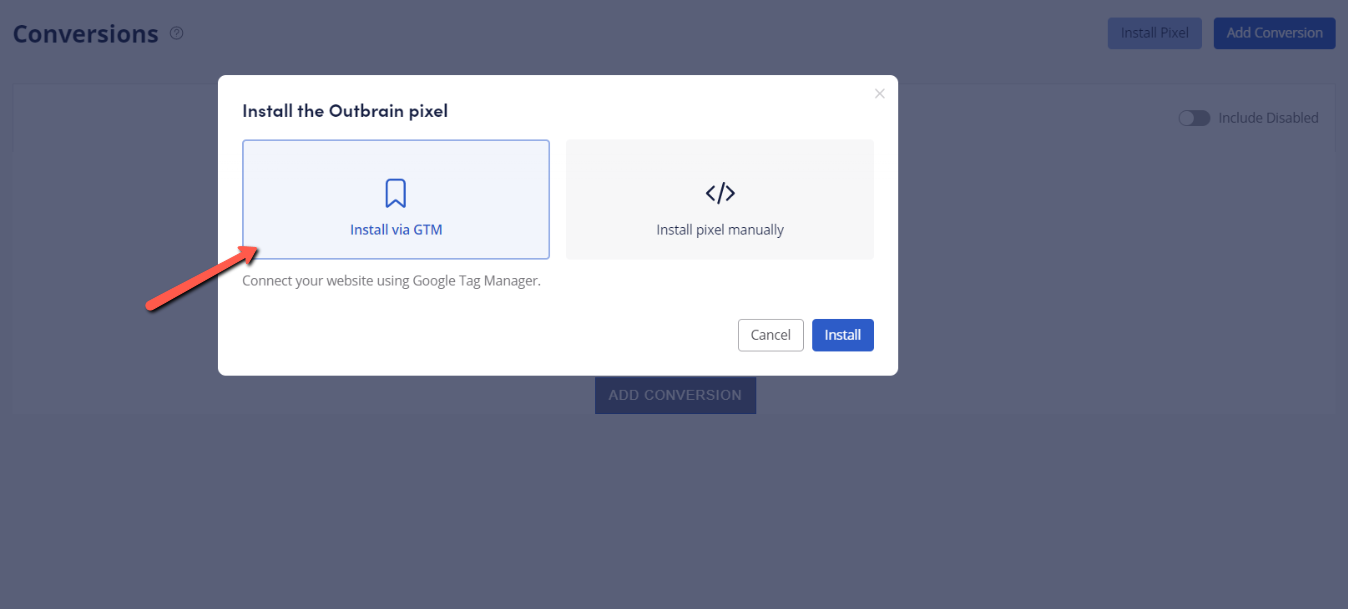
Click on that, and you'll see the options to install the pixel via GTM (Google Tag Manager) or manually. Choose the latter. A new page will open up showing the Outbrain pixel.
Nifty tip: hover over the black box, and an option will appear to copy the code onto your clipboard.
Spend a few more seconds pasting it into your website's header — this way, no user activity can go unnoticed, and everything will be fired back to Outbrain. One thing left to do is get Outbrain's browser extension to check if the pixel is working properly.
Using the Google Tag Manager to Create the Outbrain Pixel
When installing the pixel using GTM, you can either do so through the GTM dashboard or through your Outbrain dashboard.
With the Google Tag Manager Community Template Gallery, setting up the Outbrain pixel can be done in no time. All you have to do is open Google Tag Manager and select 'Templates' from the left-hand side. Then, inside the Template Gallery, you can search for and add 'Outbrain Pixel' to your workspace.
Now that your template is all set up, you just have to make sure a new tag has been created. Head on over to the 'Overview' tab on the left-hand side rail of your GTM account, and click 'New Tag.'
After that, you'll need to select 'Tag Configuration,' and under Custom Tag Type, search for Outbrain Pixel. When you've found it (and trust me, it won't be hard), then all that's left to do is select the tag properties and set up triggers accordingly. Keep in mind if you are tracking multiple conversions, it will mean creating a separate tag for each one.
Finally, don't forget to add your Outbrain Marketer ID within the Tag Configuration. This ensures that the conversions tracked by GTM are for this marketer ID alone.
If this process sounds complicated, fret not, as there's another way. Installing the Outbrain pixel with GTM has been made much simpler by the native ad platform. Just head over to your Outbrain dashboard, visit the Conversions tab and click on the 'Install Pixel' button. Now choose Install via GTM.
You will then be asked to connect your Google Tag Manager account by simply logging in to the Google account.
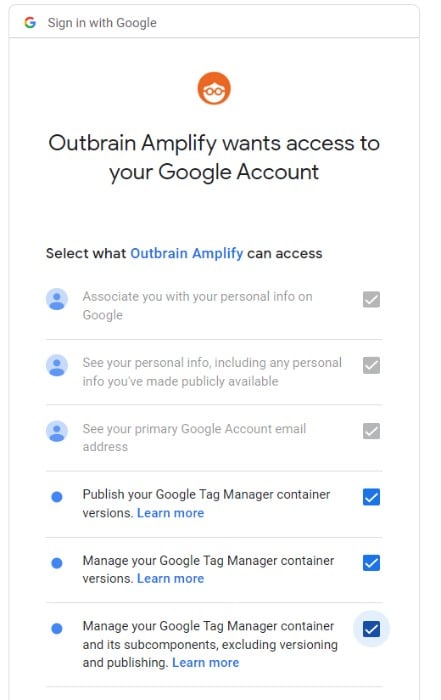
Once you approve the connection, your tag will automatically be created. All you have to do next is hit 'Publish' to activate it.
Now, head over to your GTM dashboard for setting up conversion tracking. In the Tag Configuration, there are two tag types you can choose from: Page View Pixel and Event Pixel.
Choose Page View Pixel if the conversion fires when the viewers sees a specific destination page (usually a thank you page, which indicates that a transaction has already occurred). This is also called URL-based conversion. Choose the Event Pixel if the conversion should fire when the user performs a specific action, such as adding to cart or proceeding to checkout.
Server-to-Server Tracking in Outbrain
If you're having trouble integrating pixel tracking on your site or landing page, then server-to-server is your saving grace! Outbrain's server-to-server integration allows you to get the click stats you need and conveniently keep track of user actions.
To make all of this happen, you first must create a unique event name on the Conversions page. Secondly, you must add Outbrain's click parameter (OutbrainClickId={{ob_click_id}) to your campaign's tracking code — which can easily be done from the targeting section when setting up or editing campaigns.
Finally, you must copy the postback URL and add it to your third-party tracking system or to your server so that it'll send back information on conversion to Outbrain.
Troubleshooting Conversion Tracking in Outbrain
Troubleshooting conversion tracking in Outbrain is a critical part of the process, and it pays to be up to date with error messages that could appear. If you find that your dashboards aren't showing data after a few days, take a peek at the Outbrain pixel tracker.
Possible problems you might encounter are: "Pixel not found," "Multiple pixels found," "Command not recognized," "Order value without currency," or even issues with accepted currencies and network errors. No need to panic, though — these errors are usually pretty simple and easy to remedy. Just follow the instructions indicated after each error to resolve the issue.
Conversion Tracking in Revcontent
Tracking conversions in Revcontent is much simpler than you might expect. There are again two ways to go about this: Revcontent pixel tracking or S2S tracking.
Revcontent Pixel Tracking
When it comes to using the pixel, all it takes is a few clicks to get your pixel created and ready to monitor how successful your campaigns are.
First off, go to the campaign that you want to edit, select the “Settings” tab and add your pixel. Name it, set its value, copy the HTML code provided, and paste that code between the opening and closing body tags of your conversion page. That's it!
You can keep track of multiple campaigns using the same pixel as long as it remains on the destination page. You can also add a conversion pixel during campaign setup.
Server to Server Tracking in Revcontent
When you want to track conversions without relying on cookies, server-to-server tracking is the way to go. When a unique click happens, Revcontent assigns a unique ID — that's the rc_uuid. Then, when a conversion takes place and a successful sale is completed, the rc_uuid and any events are sent back to Revcontent from the advertiser, along with a postback notification.
You don't actually have to add the rc_uuid parameter to your destination URL; Revcontent will do that on its own. Just add your URLs in your advertising campaign as you normally would.
The only thing you need to do is set up the postback on your server side or your third-party tracking system. The postback URL should look something like this:
https://trends.revcontent.com/api/v1/conversion.php?api_key=<PLACE_YOUR_API_KEY_HERE>&rc_uuid=<rc_uuid_value>&amount=<conversion_value>
If you are using Brax, you only need to set up the API integration, and the information will be easily passed on between these two.
Troubleshooting Conversion Tracking in Revcontent
Unlike the first two platforms that have Chrome-based extensions, checking whether the pixel is firing and troubleshooting for conversion tracking issues in Revcontent is done manually.
Doing this with Chrome's developer tools is surprisingly simple if you're using the pixel. First, visit the page where it is installed. Right-click on any part of the page, select 'Inspect,' switch over to the network tab, and put ‘conv.php’ in the filter box.
Manual is also the way to go to troubleshoot S2S tracking. Figuring out if Revcontent S2S tracking works may seem like an exasperating feat, but don't worry! We've got you covered with a few things to keep in mind.
First, make sure your API key doesn't contain any typos; even one could cause the whole thing to malfunction.
Next, if you manually add the "rc_uuid" parameter to your campaign's tracking variables or content URLs, it needs to be removed. This parameter and its unique value are automatically appended when a successful click event occurs — so no worries there!
Third, ensure your campaign is actively serving; no active campaign means no traffic, so no parameters or values are appended. Finally, double-check that redirects are forwarding all parameters even up to the final landing page; these have a tendency to be dropped along the way unnecessarily.
If none of these work, contact Revcontent's support team for assistance.
Conversion Tracking in MGID
If you want to keep an eye on how effective your campaigns on MGID are, then you'll want to make sure you have a system in place for conversion tracking. It's easy to set up and there are several different options available — Google Tag Manager (GTM), MGID Pixel (JS code), and Postback/S2S. All of these provide valuable insight into which campaigns are bringing the best results, though it's not recommended to use more than one to avoid scrambling your data.
Here's how you can set each of them up.
Using the Google Tag Manager to Create the MGID Pixel
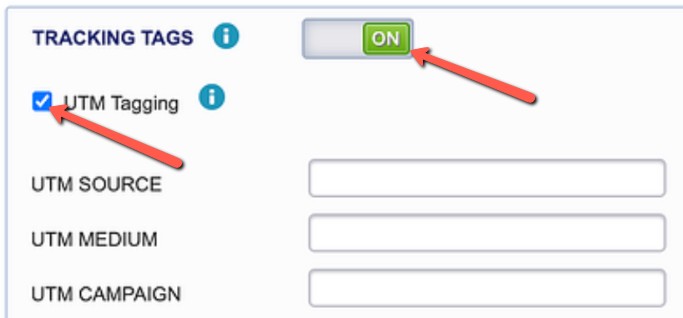
In order to successfully set up conversion tracking in MGID using GTM, first, you need to add the UTM parameters in the URL all across your flow up to the page where users complete the conversion. To do this, simply enable UTM Tagging under Tracking Tags in your campaign settings.
Don't worry about copying and pasting any code from MGID — the MGID pixel template will be available right there in the GTM search gallery. This process is very much like how Outbrain and Taboola pixels are added.
All you have to do is head over to your GTM, click 'Search Gallery', enter 'MGID' in the search field, and then click 'Add to Workspace'.
After that, initiate a new tag by selecting 'MGID Pixel' among the tag types, place your Client ID into the 'Tag Configuration' portion and pick 'Conversion to Action' as the event type. Don't forget to choose the conversion category (Sale, Lead, Install, etc.) You can also place either a fixed or a variable conversion value.
Lastly, make sure you choose the suitable trigger in the 'Triggering' section, and there you have it! Oh, and don't forget to submit and then publish for this pixel to be active.
Manually Creating and Adding the MGID Pixel
If you're looking to get your conversion tracking set up with MGID, then the Javascript Pixel method is an option not to be overlooked. Basically, it's as easy as ABC — Activate the conversion sensor in your campaign settings after copying the pixel code, and then B-fully embed code into each page of the funnel from the Landing Page to the Thank You Page.
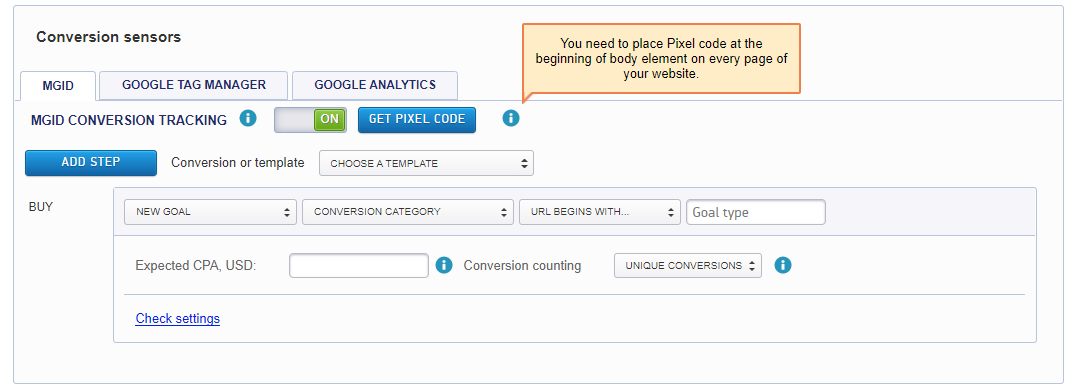
For good measure, it's suggested to place the Pixel javascript code towards the top of the webpage's body to make sure that those stats are accurate and complete.
Setting up Conversion Tracking in MGID using Postback/S2S
This one is pretty simple. All you need to do is add the parameter c={click_id} to the tracking URL. Don't forget to use MGID postback URL in your server or third-party tracker (https://a.mgid.com/postback plus other parameters) to send back conversion data.
Troubleshooting Conversion Tracking in MGID
Just like with Revcontent, checking and auditing the conversion tracking in MGID can only be done manually. So if you're using the pixel (whether you installed it using GTM or by manually adding the code), you can check if it's working by utilizing your browser's developer tools.
If you use S2S tracking, you have no other option but to inspect your URL and tracking parameters and make sure that your server is firing back the information that MGID needs to monitor conversions. If none of these work, contact MGID's support team for help and guidance.
Final Thoughts on Conversion Tracking for Native Ads Platforms
After reading this article and exploring the ins and outs of setting up conversion tracking in native ads platforms, you should have everything you need to turn your digital marketing efforts into tangible success. It may require some extra effort and skill to get it right, but when done correctly, you'll be able to accurately monitor your conversions and conversion rates, which are essential for success!
But we'll be honest and say it's not always a bed of roses. If you're still finding it difficult to monitor your conversions or if you can't pinpoint where you're going wrong with conversion tracking, don't hesitate to reach out to us! The Brax Team comprises experts in the native advertising field who will be more than happy to assist you.
If you liked this article, you might be interested in these as well:
- The Ultimate Guide to Optimization Based on Conversion Rates
- Brax in Spotlight: Create Custom KPIs and Conversion Metrics Based on Your Needs
- Increase Conversion Rates and Get Higher Quality Customers with Remarketing

