The Brax rule engine is a powerful tool that can help any company automate the data-driven decisions they need to make. Whether you're an e-commerce or content publisher, having the right set of data and metrics will ensure your rules are successful.
In this post, we'll cover what data and metrics are necessary for each type of business so you can get started on building Brax Rules that work for you!

Table of Contents:
Introduction to Brax Automated Rules
Brax Automated Rules for eCommerce Promotions
Brax Automated Rules for Content Promotions
Introduction to Brax Automated Rules
Most of the optimizations we make are based on data. So when you see a specific traffic source or publisher that is not giving you the results that you are looking for after sending a particular amount of traffic or spending a particular budget, you will either pause it, place it on the blocklist, or reduce the bid to something pretty low.
However, with the hundreds or even thousands of sources you need to look through based on a combination of metrics you need to specify, this task can take several hours to an entire day! If you would rather spend this time creating more campaigns or creatives, then you are better off automating the entire process.
Thankfully, you can do that here at Brax. Brax has a powerful rule engine that will let you combine and analyze all of your data to suit whatever needs you may have. You can set triggers, so they run automatically and are always up-to-date, allowing for maximum optimization with minimum effort on both ends.
However, it’s important to use this power wisely and build smart rules that do not overlap and make the changes you intend to make.
Ever made a rule with insufficient data? That's probably not the best strategy. It might lead you to make an incorrect decision and then have to go back, undo your work, collect more information-and all that time spent could be better used solving problems or achieving goals!
Before creating any rules, you should ask yourself if you have all of the necessary data in Brax to make good decisions.
What is the best way to make a rule? What should be your metrics for success, and what are some data points you could use to create an effective set of rules in order to not just measure but also to actually achieve that goal?
The following sections, broken down into e-commerce and content publishers, describe suggested data and calculated metrics that should be used to create the most effective rules possible.
Keep in mind that all of the rules below are examples and should be used as starting points. You would have to tweak the numbers to fit your campaign targets. You can also adjust these to match the level of aggressiveness you are aiming for.
Brax Automated Rules for eCommerce Promotions
To make your ad campaigns successful, you need to have the right data coming into Brax. For eCommerce stores, it's essential that conversion tracking reporting is accurate before pushing any significant changes through.
Conversion Tracking Options
In order to have the best experience on Brax, it is essential that you get all of your traffic and conversion data correctly and accurately. There are three ways to do so:
1. Tracking Pixel
This is a code that you generate from your native advertising platform and integrate into your website. It allows your native advertising provider to monitor the activities of the customer that comes to your store from the traffic they send.
The process of adding a pixel is almost the same across various platforms, but it would be best to follow your traffic provider's instructions to ensure accurate tracking. Once the pixel is placed, Brax will be able to monitor the traffic as well (as long as you link your traffic platform account to Brax).
The following are the guides of native ad platforms to installing their tracking pixel:
2. Tracker Integration
If you choose to use your own setup and you have conversion data in Google Analytics or Voluum tracker, that is fine, too. You can integrate any of these two with Brax.
Check out this guide on how to link your Voluum account to Brax.
And here's the guide for linking Google Analytics to Brax.
3. API Integration
Finally, if none of the above works for you, Brax has a fully functional API that you can use to import conversion data. Read our guide to Getting Started with Brax Marketing API, as well as the Custom Data Import Metrics to set this up properly.
We recommend pushing data every hour to keep up with Brax’s normal data pull schedule.
After configuring your tracking options, it would be best to send a test conversion to see if the data is reflecting accurately. Once done, you can proceed to the next step.
Automated Optimization Process for eCommerce
The optimization process outlined below is dependent on a CPA goal. This works well if your actual CPA is somewhere between $30 and $40. But if the product or service you are promoting has a CPA above this range, you would have to create additional rules and even combine CPA with other metrics such as Page Views (pageviewPerSession).
Running twice the CPA before blocking a site does not work if your CPA is $250 (for example); you might end up losing thousands before finding a profitable source if that's the case. It would be best if you built additional rules to optimize your campaign based on upstream data.
From here on out, we are going to assume conversion data is coming in through the native pixel and that there is a target CPA of $10.
Calculated Metrics
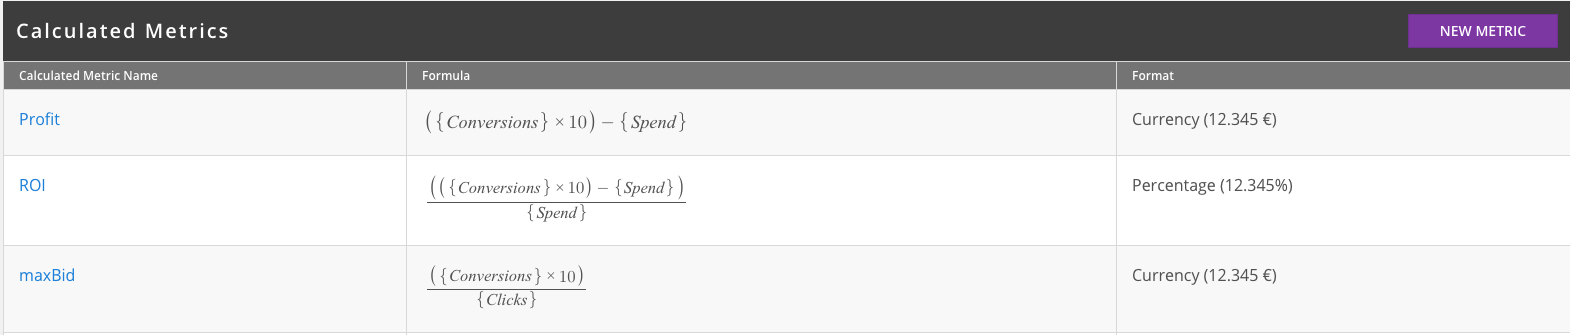
A core benefit of Brax is Calculated Metrics. You can utilize data from different sources and combine them to create powerful metrics that you can use to make decisions and run rules.
For eCommerce publishers, we recommend the following rules:
- Profit = (conversions * target CPA) - spend
- ROI = Profit / spend
- maxBid = This is the most you can bid historically to hit your margin target. This works out to (conversions * target CPA) / clicks
Suggested Rule Templates for eCommerce
New rules can be created through the Rules tab in Brax's dashboard. Simply click on the New Rule button at the far right of the page, above the table. You will be given various rule options based on what you want to do and the traffic platform that you will be implementing the rule in.
Good rules should cover nearly all of your campaigns but must not overlap and be so aggressive as to cause wild swings in your bids.
Here are some automated rules we have created. Remember that these are based on our CPA target of $10. When creating your own rules, you must adjust these based on your own CPA goal.
Also, do not forget to assign the rule to the specific campaign from the particular traffic network, else these rules will apply to All Campaigns you are currently running.
Rule #1: Block Sites No Conversions
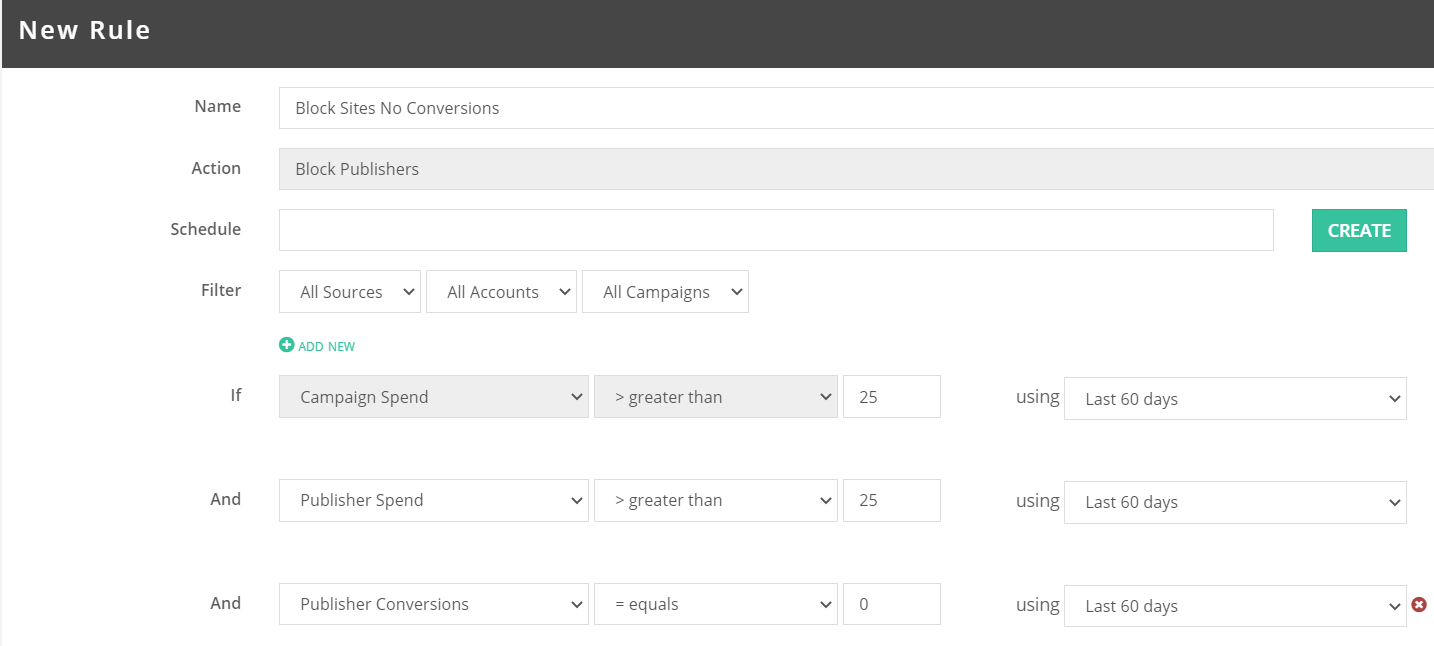
If a site has spent more than $25 (2.5x CPA) over the past 60 days with 0 conversions, block the site.
Rule #2: Lower Sites No Conversions
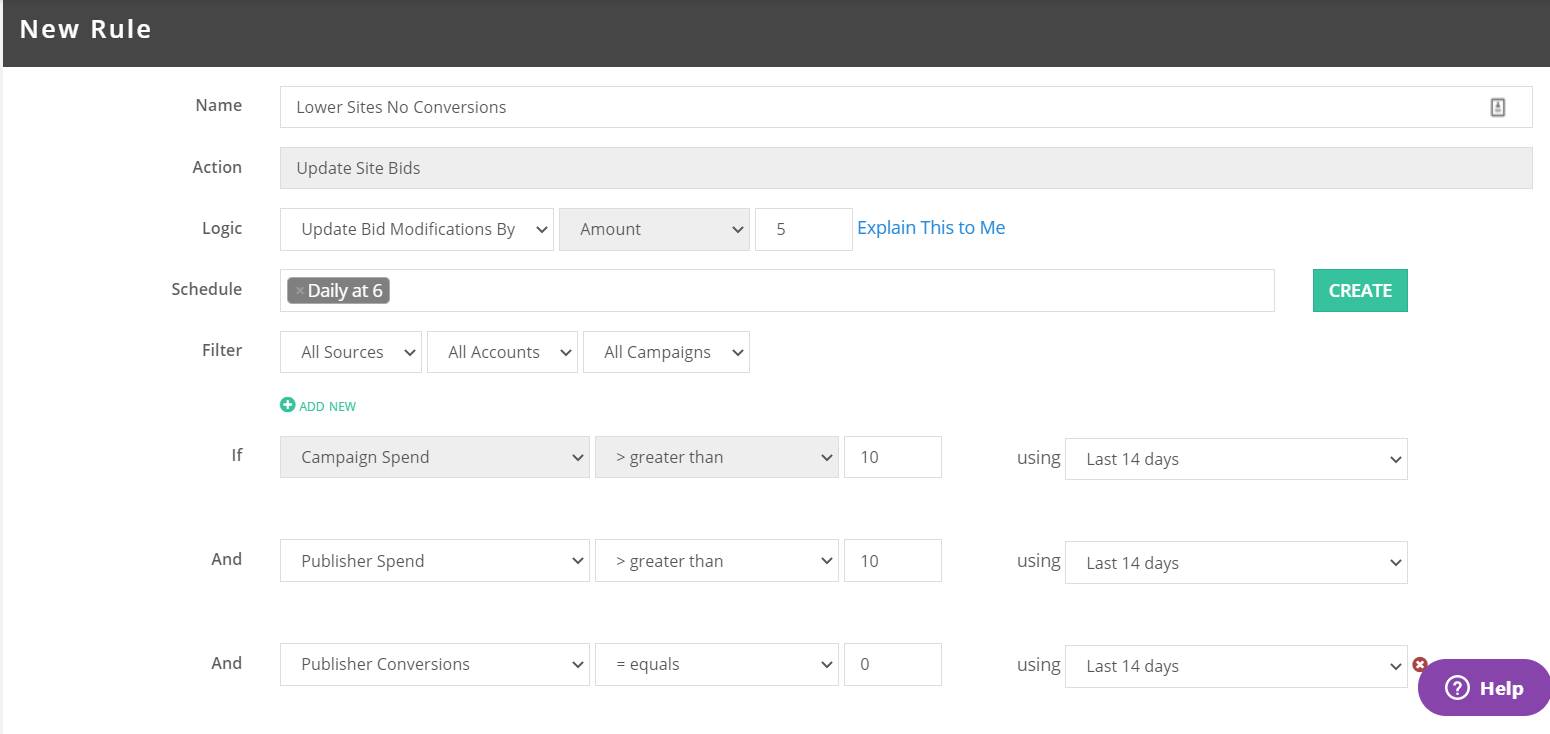
If a site has spent more than $10 over the past 14 days with 0 conversions, lower the site bid by 5%. This will reduce the bid for a specific site once it goes past $10 in ad spend but will not totally stop it from sending traffic.
Hopefully, we will get a conversion from this site before it hits the $25 block limit.
Rule #3: Set to maxBid
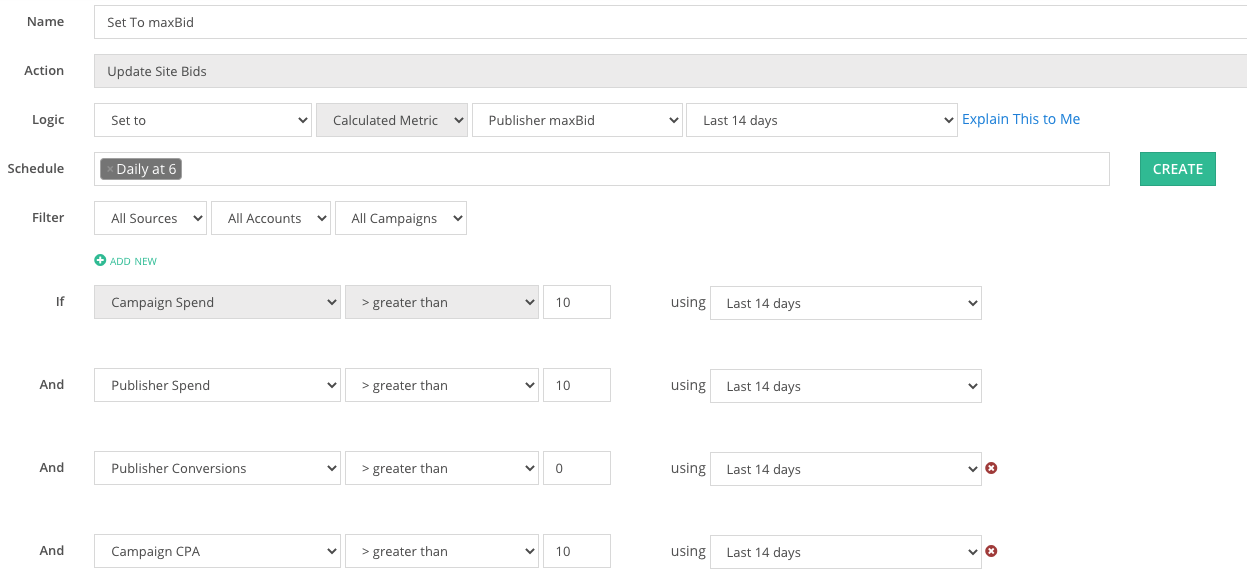
If a site has spent more than $10 over the past 14 days and has at least 1 conversion then there is some history for that site.
If the CPA is greater than the target CPA, in this case $10, then we should set this site to the maxBid that we calculated previously. You can do this via the Set To option under Logic (see screenshot below).
This will ensure that the bid for any site that is not profitable will be changed to a level that has been proven to be successful based on past data. This is the quickest way to bring underperforming sites back into range.
Rule #4: Increase High Performers
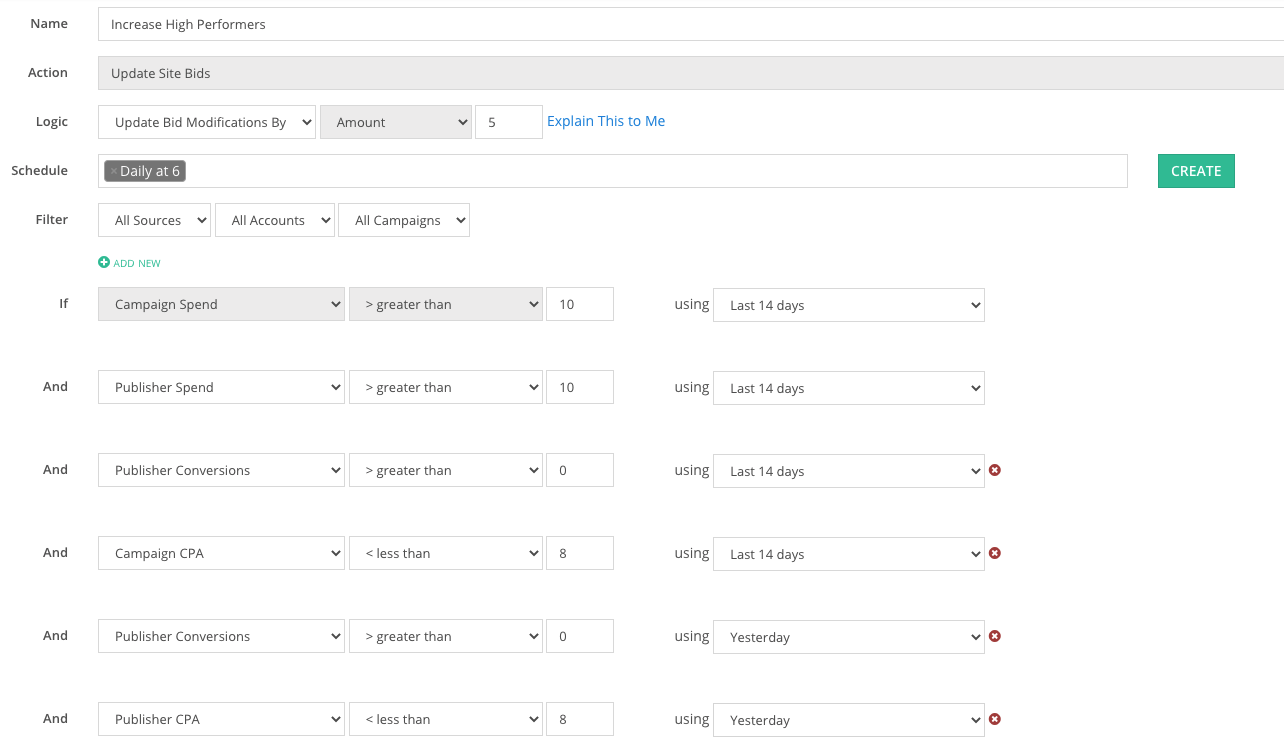
If a site has spent more than $10, has at least 1 conversion, and has a CPA of less than $8 (20% better than CPA target) over the previous 14 days, then we know the site is performing better than our target over that time period.
However, we don't want to increase the site continually until we give up all the margin and the site is now negative. As such, we should add an extra check that the site had at least 1 conversion yesterday and the CPA is below $8 yesterday as well. If all these conditions are met then we can increase the bid 5% in an effort to get more traffic.
Rule #5: Find New Sites
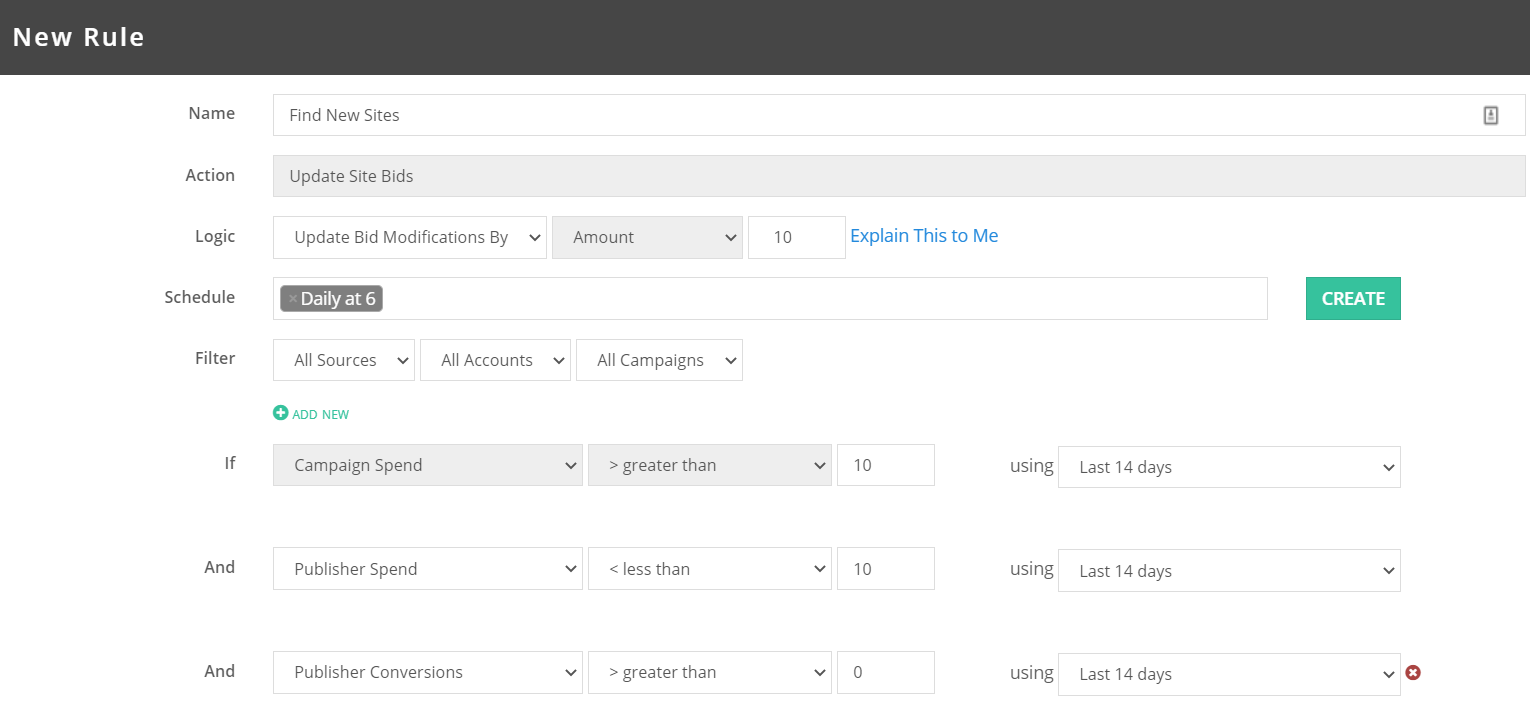
If a site has spent less than $10 over the past 14 days and has more than 0 conversions then increase the bid by 10%.
This is a low-risk rule as the site has already converted and once it spends over $10 across a 14 day period it will be caught up in other rules. It is a good way to discover new sites and spend a few dollars to see if they have potential.
Rule #6: Pause Poor Creatives
For eCommerce, we generally recommend pausing poor creatives by hand. However, if you have many variations and manually sifting through data of each creative can take a bulk of your time, it's easier to just set a rule and pause creatives based on ad spend and conversions (or lack thereof).
We recommended pausing a creative that has spent at least 1.5x your CPA target or more. So if your CPA target is $10, then set the rule to $15 or $20.
You want to be careful that you do not pause all ads in a campaign else, your traffic will come to a halt. In general though, pausing ads is best done manually as it’s not a daily occurrence.
Scheduling
When running rules, you can schedule them to run automatically so you can just set it and forget it. For the sample rules above, Brax recommends running the following schedule:
- Rule #1: every hour or two
- Rules #2 to #5: every morning, as soon as the previous day’s data is finalized (6 am seems to be a good time)
- Rule #6: manually (or at most daily)
Schedules can be created and adjusted in the Schedule Tab in the dashboard.
You can also utilize schedules if you choose to daypart. For instance, you can set a rule to decrease bids every day by 20% at 4 pm and then increase bids by 25% (so the math works) at 12 or 1 am.
The challenge here is that doing this will mess with your maxBid rules, so we do not recommend starting this way. Eventually, it would be better to use Brax to create a specific campaign to run during the days and another to run only at night. You may also choose to break out weekends as well.
You do not have to worry about managing more campaigns because with Brax's automated rules, more campaigns do not mean more work for you!
Brax Automated Rules for Content Promotions
Similar to running ads for promoting eCommerce products, a prerequisite to establishing automated rules for content promotion is conversion tracking.
Ad Tracking
There are two ways to push data from content promotions into Brax, and these are via Google Analytics and API. If you've skipped the conversion tracking section above (under eCommerce Promotions), here they are again:
1. Google Analytics
Here's the guide for linking Google Analytics to Brax.
2. API Integration
Brax has a fully functional API where you can import conversion data. Read our guide to Getting Started with Brax Marketing API, as well as the Custom Data Import Metrics to set this up properly.
Ideally, revenue data should be pushed every hour to keep up with Brax’s normal data pull schedule.
Again, after configuring your tracking options, it would be best to send a test click or conversion to see if the data is reflecting accurately. Once done, you can proceed to the next part.
If you're having trouble doing this yourself, you can reach out to our team. Brax also has a data services team that can do this on your behalf for all Enterprise users. We have more formal connections with platforms like AssertiveYield and Proper.io, but our team can build custom connections when required.
Automated Optimization Process for Content Promotion
Brax is all about actionable metrics, even when it comes to content marketing. You can use data from different sources to create powerful business insights and run rules that generate success; this ensures you're always on top of your game.
Calculated Metrics
A core benefit of the Brax dashboards is a calculated metric, which includes using information gathered from several sources in order to make decisions and set up triggers for future actions or events.
The analytics will be able to help guide you through any major decision while providing rich datasets so that there are no blind spots when it comes time for making crucial choices--allowing you to keep one step ahead at every turn.
For content publishers, we recommend the following rules:
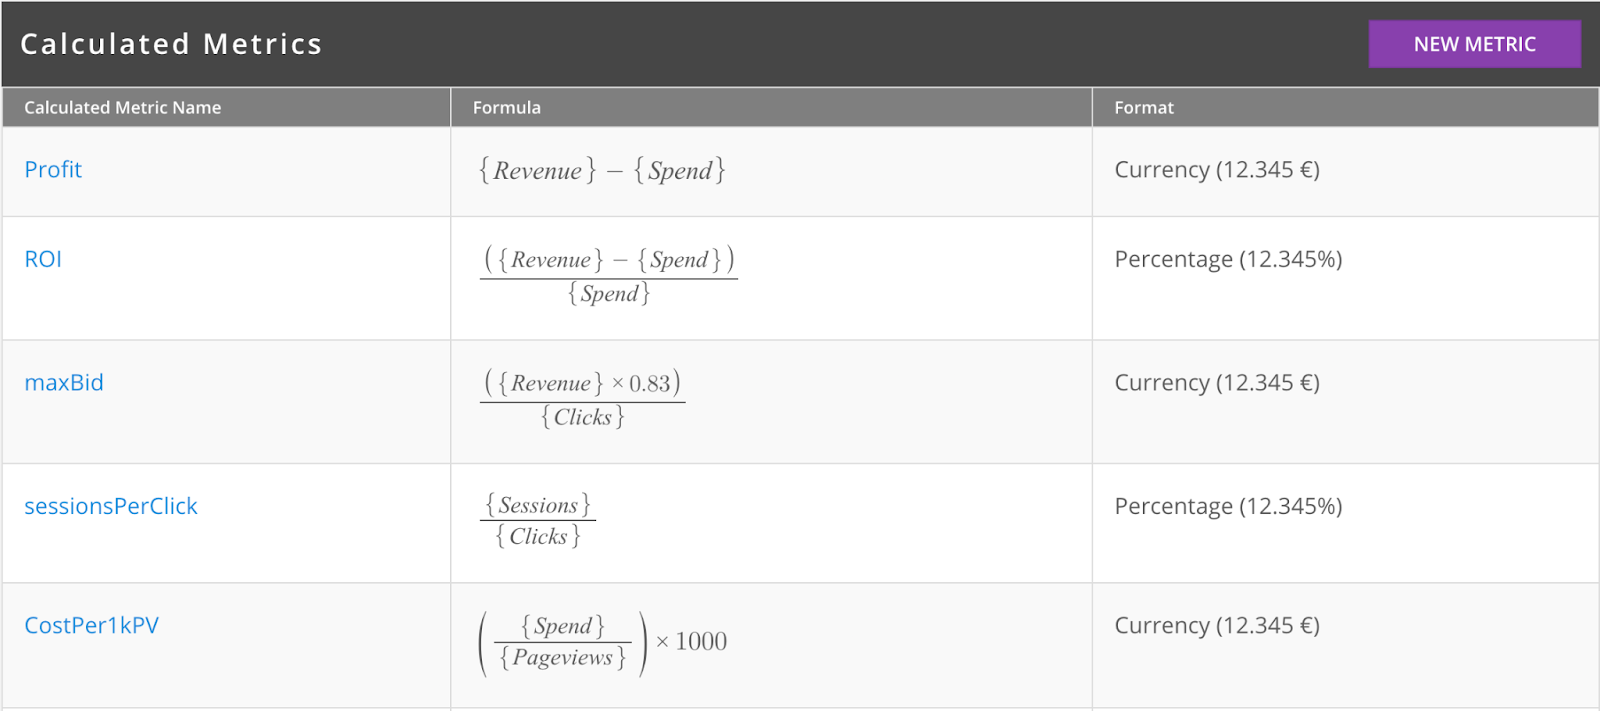
- Profit = Revenue - Spend
- ROI = Profit / Spend
- maxBid = This is the most you can bid historically to hit your margin target. For instance, if you had a 20% margin goal, the formula would be: (revenue * 0.80) / clicks.
Change this formula according to the profit margin you want to achieve.
- sessionPerClick = sessions / clicks
- CostPer1kPV (cost per thousand views) = (pageviews / clicks) * 1000
Suggested Rule Templates for Content
Remember, good rules should:
- cover nearly all of your campaigns (or all campaigns you want this rule to run in);
- not overlap;
- not be so aggressive as to cause wild swings in your bids.
When creating automated rules, the first step is done by clicking on the New Rule button in your Brax dashboard. This will give you various rule options based on what you want to do (block, update bids, pause), and which platform you want to implement these new rules into.
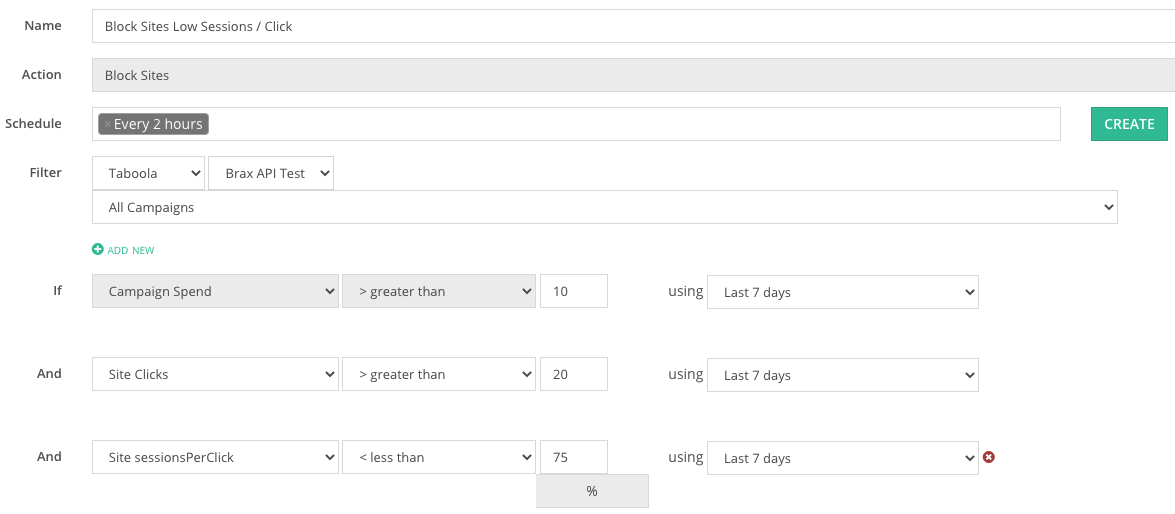
Rule #1: Block Sites Low Sessions / Click
If a site has sent more than 20 clicks over a 7-day period and the sessionsPerClick percentage is less than 75%, then block the site. This is very conservative as you should expect 97%+, but typically you want to adjust based on actual revenue and profit.
This rule is simply to catch the poorest performers and filter out bad traffic.
Rule #2: Block Poor Sites
For any site that has spent more than $2 over the past three days, block any site that has a margin below -70%. Obviously, -70% is not a good margin, but the goal here is to block the poorest performers.
These sites are performing so much worse than the others in your campaign. Therefore, it’s not worth lowering their bid down 80% to try to get some tr; it’s it’s better to just block and focus on the higher-performing sites.
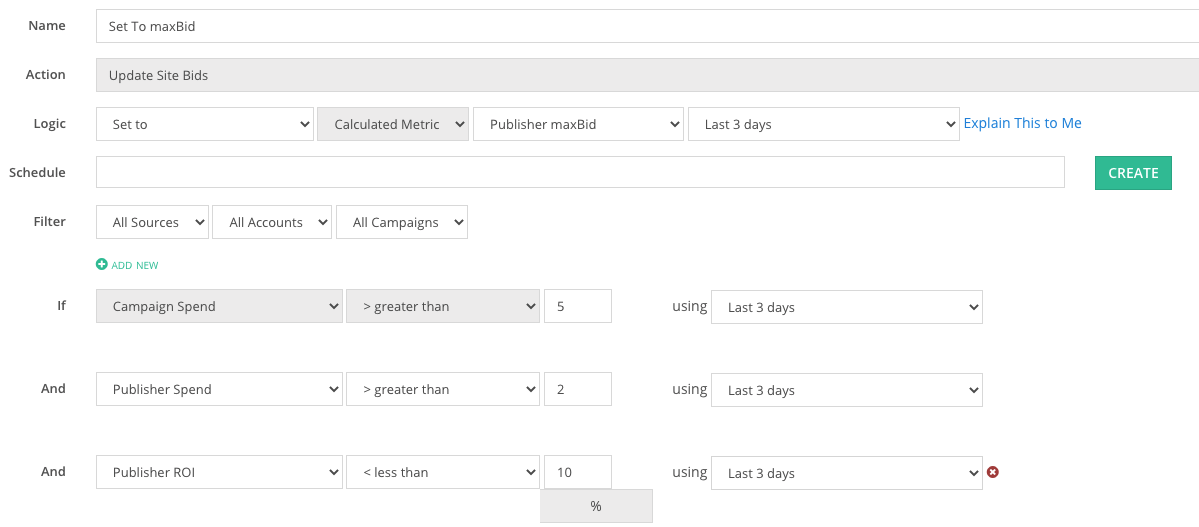
Rule #3: Set to maxBid
If a site has spent more than $2 over the past three days and the ROI is less than 10% set the site bid to the calculated metric maxBid.
This utilizes a very powerful feature in Brax in that you don’t need to move site bids down by a percentage each day until you find what works. You know the maximum amount you can pay per site to hit your margin, and you set the bid to it immediately.
The margin and the amount of time you look back can all change, but you are effectively making sure that all your underperforming sites are immediately adjusted to either bring them back to profitability or to stop them from spending.
Rule #4: Increase High Performers
Increase the bid by 5% if a site meets the following criteria:
- Spent more than $2 over the past 3 days;
- The ROI is more than 30% over the past 3 days;
- The ROI yesterday is also more than 30%.
This will make sure the 5% increase still keeps you within your ROI target. Plus, by checking that the margin was strong over a period of time and that it was strong yesterday, you ensure that it wasn’t a one-day fluke. You also increase the bids slowly, making sure you don’t keep increasing until you are negative on a 3-day lookback.
Rule #5: Pause Poor Creatives
We suggest that you add between 9 and 16 creatives per campaign.
9 variations = 3 images x 3 headlines
16 variations = 4 images x 4 headlines
Once you have run a few campaigns and you get an idea of what a good costPer1kPV looks like, you can create a rule to pause creatives that are underperforming based on your average.
It’s difficult to run this rule automatically as all campaigns are different, and you don’t want to pause all creatives within a given ad. We typically recommend publishers run this rule manually and review the results before executing.
We also recommend using the costPer1kPV metric to manually pause underperforming creatives.
But if you already know the point at which cost per 1,000 views is profitable for a specific campaign, you can set the rule up and assign it to just that campaign. This can be useful if you are running dozens of ad creatives within the campaign.
Scheduling
The best part about automation is that you can schedule it to run every so often so that you won't have to check it from time to time. You can create your own schedule in the Schedule Tab.
For the sample rules above, Brax recommends running the following schedule:
- Rule #1: every hour or two;
- Rule #2: every hour or two;
- Rule #3: every morning, as soon as the previous day’s revenue is updated;
- Rule #4: every morning;
- Rule #5: manually (or daily, at most.)
Dayparting can also be done by utilizing schedules. For example, you can set a rule to decrease bids every day by 10% at let's say 5 pm, and then increase bids by 20% at 12 midnight or 1 am.
However, bid adjustments like this can cause issues with the maxBid rules. If you want to do it this way, make sure that you have not set up conflicting rules.
It would be more effective to create two separate campaigns that run at different times of day if you want to bid differently. You may also choose to separate campaigns for weekdays and weekends.
You don't have to worry that breaking out campaigns would mean more stuff to manage because that's what Brax's automated rules are here for.
Final Thoughts
Brax is a powerful automation engine that can help you manage your campaigns easily using rules. Setting up rules won't even take long!
However, it’s important to use this power wisely and build smart rules that do not overlap and make the changes you intend to make. To create effective automated rule sets using our platform, ensure that your conversion tracking is in place before creating any rules. This way, your decisions are based on accurate information for maximum effectiveness.
Aside from Rules, our platform has other powerful tools such as Bid Templates, Power Editor, and more.
Need assistance in setting up rules for your campaigns? We would be more than willing to guide you. Just reach out to us at love@brax.io.

