If you would notice, some ads appear on certain websites but don’t appear on others, even when the websites you are viewing all display ads from one traffic provider (like Outbrain or Taboola, for example).
You might think that it’s because the ad simply did not win the bid. Although that’s possible, it can also be because the advertiser specifically chose to display (or not to display) ads on certain websites. This technique is called Whitelisting and Blacklisting, and it is one of the secrets to ads with high ROI.
Table of Contents
What is Blacklisting?
What is Whitelisting?
What Can You Blacklist or Whitelist?
Why Use Blacklisting or Whitelisting?
How to Create Your Target List
How to Apply a Blacklist or Whitelist to Your Native Ads
In the online world, Blacklisting not only pertains to blocking traffic sources, but also blocking malicious software, sites and applications as a means of tightening security. Since we are in the business of advertising, we will be discussing the Blacklisting and Whitelisting concept that is related to marketing.
What is Blacklisting?
When entering an office building, you won’t be allowed inside without first requesting an appointment. Even then, you would need an ID before you are even allowed inside. Some people aren’t even allowed even when they have complete credentials.
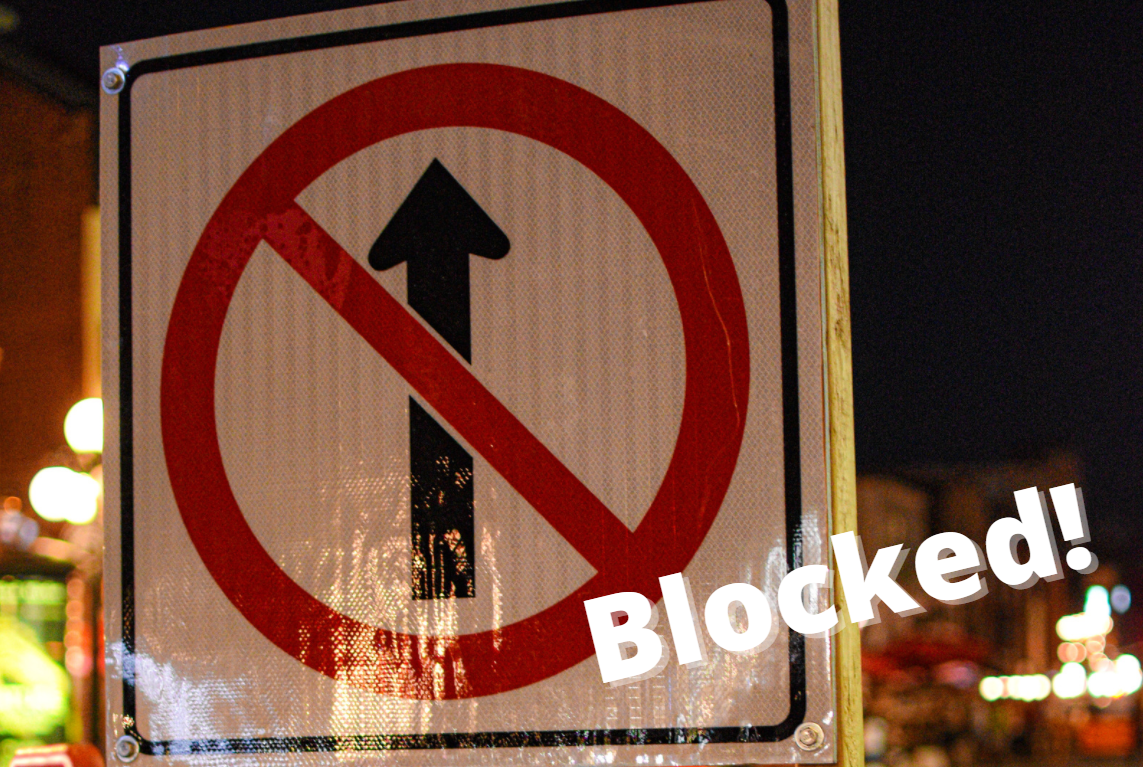
And when people are banned from entering a building (or any property, town or country), it’s because they have been blacklisted. The same concept applies to Blacklisting in Media Buying.
Blacklisting means you prevent certain traffic sources or ad placements from showing your ads.
If there is a certain website that has yielded negative ROI for you, or if it doesn’t match the niche which you would like your native ad (or other ad form) to be seen in, then you can blacklist that site.
Blacklisting is sometimes called negative targeting, exclusions or exclusions list.
Sometimes, you are not interested in receiving traffic from a specific source or publisher. If the provider allows it, you can filter those out, too.
Publishers (also called sources) are assigned a specific publisher ID to make it easier for ad networks and advertisers to know where their traffic is coming from.
Steps to Creating a Campaign with a Blacklist
The steps to blacklisting a site or source are usually the same no matter the ad provider. Keep in mind that when blacklisting, you block certain sources while allowing the rest to come through.
1. Create a Campaign as is usual for your ad network.
2. Get the list of sites or sources you want to block and place them in the space for Blacklist.
We’ll discuss later how you can get a copy of these sites and sources.
3. Save your campaign and wait for approval.
That’s it! Pretty simple, yes?
The only hard part is in actually building or getting hold of this list.
Traffic providers typically allow advertisers to add more items to their blacklist even while the campaign is live and running, so you won’t have to worry if you missed a few items.
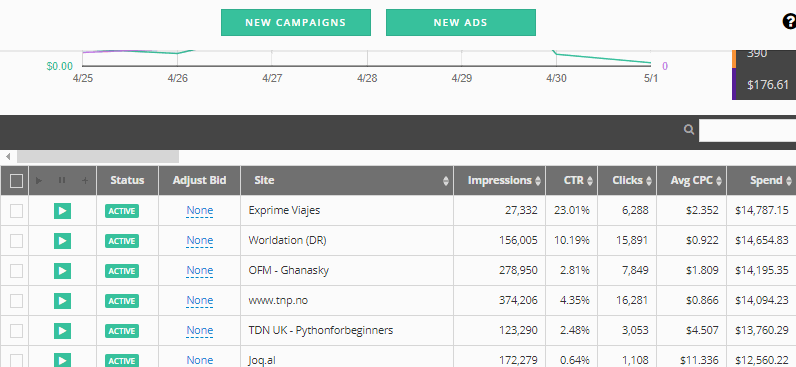
You can also block sites and sources that have already delivered traffic to your page if you find that they are not working for you. This can usually be done in the campaign stats dashboard.
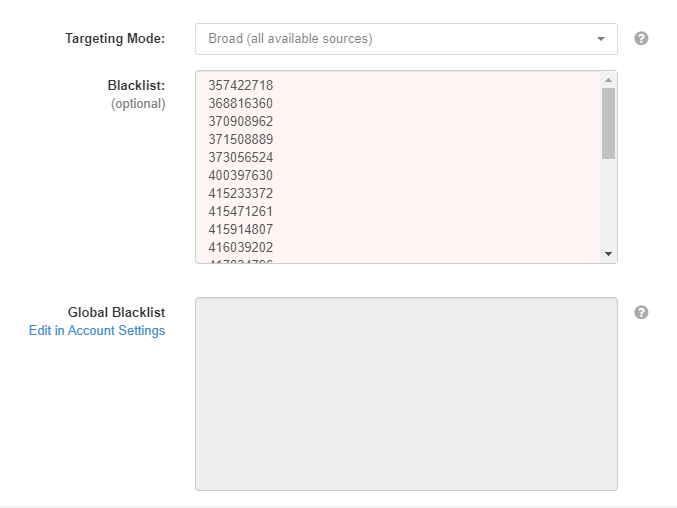
What is Global Blacklisting?
You might have noticed from the image above that displays an example of how to blacklist that there is an option for Global Blacklisting.
It is when you don’t want to receive traffic from specific sites or sources for ALL your campaigns. If you apply Global Blacklisting, all your past, present, and future campaigns will not get traffic from these blocked sites.
This option is not available for all ad networks, though.
What is Whitelisting?
If you can block some sources and allow everything else, you can also do the opposite, which is what we call Whitelisting.
Whitelisting is allowing specific sites to display your ads or deliver traffic to your page, while blocking the rest.
If there are certain websites or traffic sources that deliver positive ROI for you consistently and they have a lot of volume, then you would of course want to get most (if not all) of your traffic from them, right?
Also, whitelisting is necessary if you want your ads to be displayed on specific sites only, especially if these are niche sites that match your offers entirely.
Steps to Creating a Campaign with a Whitelist
Adding a whitelist to your campaign is pretty much the same as when creating a campaign with blacklists.
1. Create a Campaign
2. Get the list of sites or sources you want to get traffic from and place them in the space for Whitelist.
Again, we’ll discuss in a short while how you can get a copy of these targets.
3. Save your campaign and wait for approval.
Although the process is similar, the effect is the opposite.
What Can You Blacklist or Whitelist?
When creating a campaign, there are other ways to actually limit the incoming traffic. This is with the help of proper targeting. The amount of ways to filter and target incoming traffic depends on the ad network you are working with.
For native ads, for example, you can target traffic based on geolocation, language, device type, operating system, OS version, or even category. View this post for a full list of native advertising targeting options for the ad networks we support.
Now aside from these targeting options, you can filter your traffic even further with either blacklisting or whitelisting.
A target is an all-encompassing term for all types of items that you can blacklist or whitelist. It can be a keyword, a domain name, a source ID or even a sub-ID. It really depends on your ad network which ones they allow to be blacklisted/whitelisted.
As we’ve stated above, you can do this for sites and publishers. But is that all? Let’s discuss all other ways.
1. Domains
When blacklisting based on domains, you exclude traffic from specific sites. This is one of the most basic items you can blacklist. You can block or allow domains and even TLDs (.com, .net, etc.).
You can do the same for subdomains. If you blacklist, for instance, want.com, everything under want.com will be blocked. If you indicate just blog.want.com, then you will be blacklisting traffic from that subdomain alone, leaving other areas of the website, such as shop.want.com, to still bring you traffic.
2. URL
This is just like a variation of domain filtering, except that with this one, you can target the exact URL or link to the page you want your traffic to come from. That means if there’s enough traffic from the exact pages, you can hyper-focus on them.
It is also possible to filter URLs based on specific words or strings of characters, even if the domain name is not mentioned. We will discuss this further under Keywords.
3. Publisher or Source ID
This is another type usually allowed to be either blacklisted or whitelisted. A publisher is a single entity that owns multiple traffic real estate or ad placements, such as websites and applications.
You can allow all traffic from a single publisher, or block them altogether if you think this publisher’s traffic doesn’t match your needs.
This is useful if you have gathered data that the publisher’s ad placements fall under a single niche, or if his traffic's quality is not suitable to you.
A publisher ID is equivalent to a source ID in some networks. Likewise, source IDs can also be referred to individual websites, so make sure you look into your network’s documentation to determine which is which.
4. Keywords
Some traffic providers allow you to narrow down your traffic by using keywords. Keywords can be any kind of word or even brand name.
Ad networks scan their publisher’s webpages to see if the keyword matches any of the content. Some networks scan the website URLs to see if the keyword matches any part of the link (as mentioned in #2).
There is an extra step in blacklisting or whitelisting keyword phrases. If your keyword has two words or more, then you need to indicate whether you want:
- at least one of the words to be present;
- all the words must appear, but in any order;
- all the words to be present and must be in the exact order.
How to do this depends on the ad network. Most of the time, it only involves placing keywords in a bracket or square bracket. Again, you just need to look into the documentation of your traffic provider to know how to do that.
5. IP
As you very well know, ISPs can be filtered during campaign set-up, but blacklisting or whitelisting IP numbers is different. An IP is a unique numerical code assigned by the ISP to a specific device or household.
IPs can be dynamic, which means it changes based on specific intervals; or static, which means it does not change even if the user turns off the device or modem. It is a very good identifier of potential customers.
6. Placements
Placements are ad locations or real estate that you choose to display your ad in. It could be certain positions in a website, such as above the fold (at the header area), on the side bar, within the content, at the footer, and more.
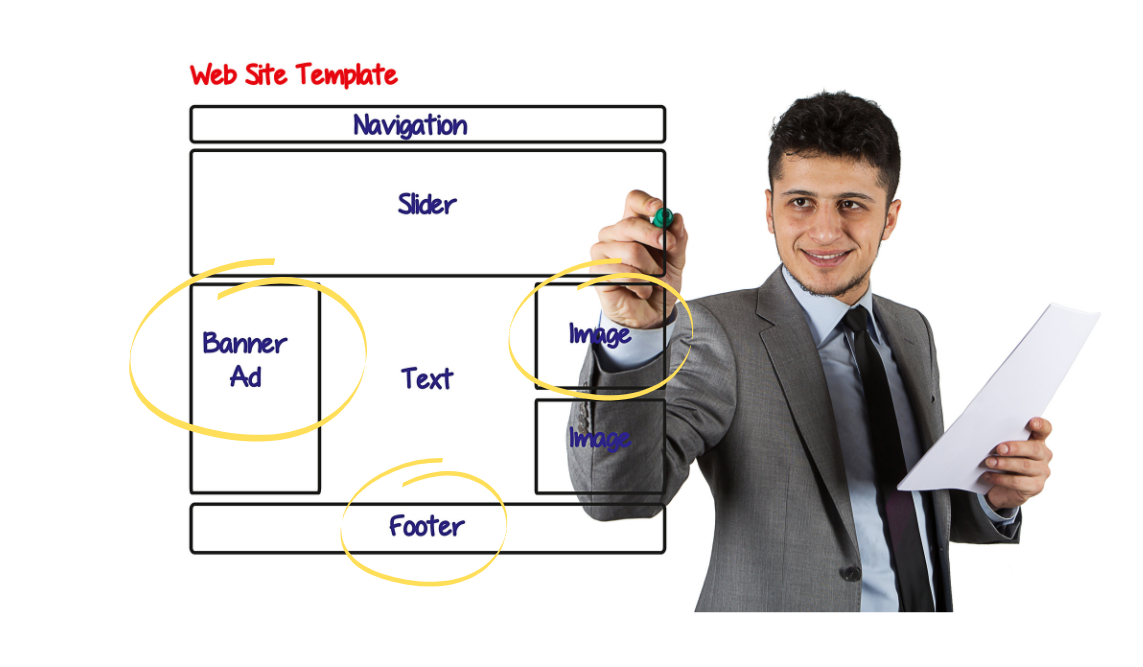
An ad placement can also be advertising real estate in an app, or between website pages (interstitial), or in pop ups.
In short, ad placements is anywhere your ad can appear in.
This term is commonly used by display and native traffic providers as these are the ones that can display ad creatives in multiple areas in a single page.
How is blacklisting an ad placement be different from choosing a placement using your targeting options?
Well, think of it like this. An advertiser opts to run a single campaign for a specific creative for multiple placements, instead of creating one campaign for every placement (which can be time consuming and can lead to several campaigns to manage).
When running his campaign, he notices that website A is delivering positive results. However, Website A has five placements, and only two of them bring the conversions, specifically Placements 2 and 4. The other three are duds.
What he does next is blacklist Placements 1, 3, and 5 from Website A. This way, he will be rejecting useless traffic while accepting good performing ones from a single website.
In essence, blacklisting is a great tool to use if you have no data as of campaign creation.
7. Sub-ID or User ID
This is the most specific whitelisting or blacklisting there is. A sub-ID is an identifier code that is unique to every user. It is assigned to the user the first time he visits a page or app that a traffic network displays ads in.
It can be tracked with the help of cookies left on the user's browser or computer, or it can be captured with the help of a pixel embedded on the page.
Sub-ID whitelisting is typically used when creating remarketing ads.
Think about a user that visited your first landing page, scrolled through your content and stayed for a minute. During this time, the tracking system has registered his unique sub-ID.
He has shown Interest in your offer but was not ready to buy, so he leaves.
Expert marketers know that a person that registered interest but did not buy cannot automatically be considered a lost customer. In fact, if you master the AIDA principle, you would know that this user is considered 'warmed up' and is ready for the next stage.
You then collect this user's sub-ID, and together with other sub-IDs that have performed similar actions, you whitelist them to a campaign that shows a creative on the next rung of your marketing funnel.
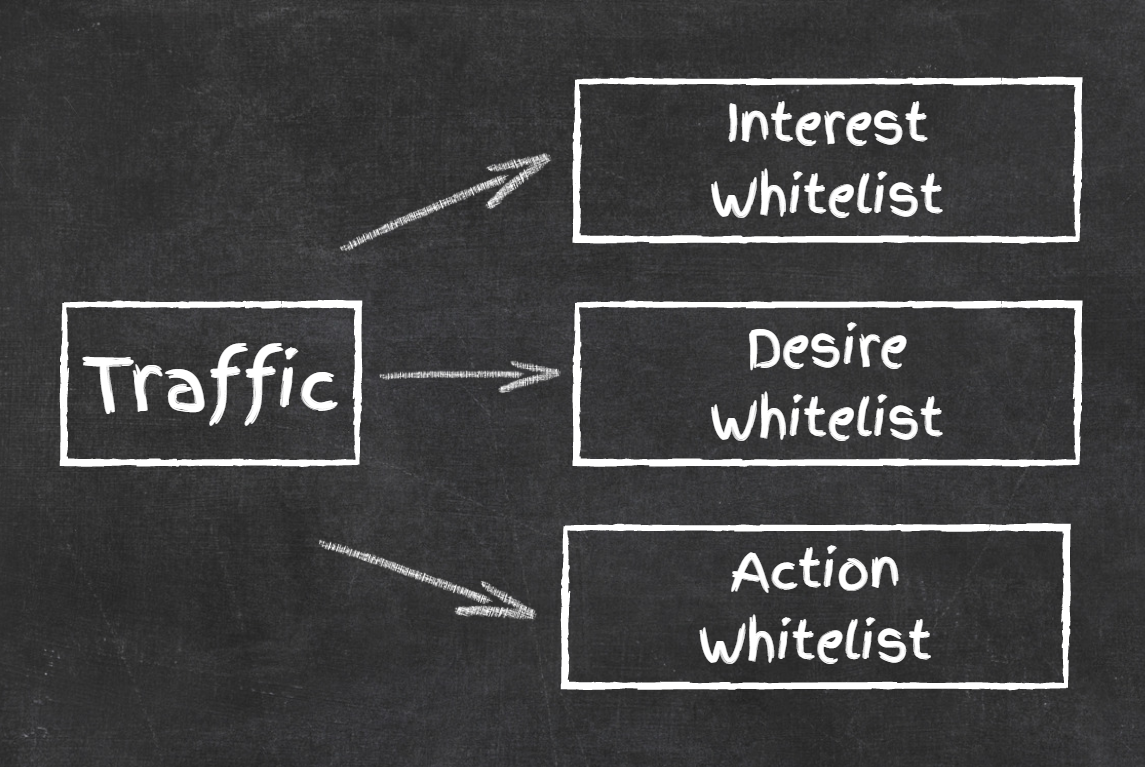
Let us demonstrate a more concrete example.
First off, the advertiser creates three kinds of Whitelists according to the advertiser’s marketing strategy. He creates:
(1) Interest whitelist,
(2) Desire whitelist, and
(3) Action whitelist.
He then starts running traffic.
User 123AB (sometimes sub-IDs are more complicated than this code) visited his landing page and left after a couple of minutes. This user will be placed in his "Interested" whitelist.
User 456CD visited the landing page, clicked on the call to action button, viewed the offer page and then left. This user is already on the "Desire" stage, so he will be added on that whitelist.
User 789EF went through all the motions of viewing the landing page, clicked a CTA button, viewed the offer page, then either added the product to cart or clicked on the Checkout button, but then held back and left the page. This person will then be added to the "Action" stage whitelist.
Now, when promoting to these people, the advertiser must present them with different sets of ad creatives and landing pages in order to move them towards the right direction.
Here’s what the advertiser creates for his whitelists:
-
Interest Whitelist
The ad creative here will reinforce what the user first saw in the initial ad and landing page. However, the landing page will not contain the same old content; instead it will promote more benefits and features to the page to encourage the user to click on the CTA button. In short, the Curiosity Principle will be utilized.
If the initial landing page is long-form content, then usually this one will be short-form. If the initial landing page is short-form, then this must be long-form content.
Find out more about the length of your content through our guide to writing long-form and short-form content.
-
Desire Whitelist
For those in this whitelist, the advertiser already knows that the user desires the offer. All you need to do is add a little push. You can apply one of the most popular advertising angles: giving discounts, free items and bonuses.
Remember that users on this list have already shown interest, but something about the offer page discouraged them. It could be that the price warrants them to spend some time to think first before proceeding. If you can make the offer more irresistible (discount, free shipping, free item, etc.), then moving them to the next stage can become simpler for the user.
-
Action Whitelist
Have you ever received an email or seen an ad telling you that you left something in your cart? If you have, then you are in someone’s remarketing whitelist.
For this group, the advertiser will send an ad like mentioned above, made more enticing with the use of the Urgency Principle. This includes adding a countdown and discounts both in the ad and in the landing page.
An urgency in the ad would display something like “available only today” or “available only for 3 hours”. Then the landing page will have an active countdown, whether for the remaining time you can grab the offer, or the remaining stocks.
With this style of marketing strategy, you can expect to increase your conversions.
Why Use Blacklisting and Whitelisting?
There are several advantages using a blacklist or whitelist for your advertising campaigns. In reality, if you don’t do this, your marketing efforts would be equivalent to shooting in the dark.
If you’re still on the fence, here are some points you need to lament on:
1. For Brand Safety
There are some places you want to your ads shown, and some places you want to avoid. Examples of the latter are:
-
Spam & Illegal Content
There are thousands of sites that are spammy and illegal. You don’t want your brand or company to be associated with such sites, would you?
Sure, ad networks would tell you that their traffic is a 99.9% brand safe. But what if your ad gets displayed in that 0.1% portion of sites that are not safe?
Imagine that you’re promoting a streaming service and it shows up in a torrent site. It seems like you’re giving your potential customers the idea that your own content has been obtained illegally.
Ad networks constantly monitor and improve their screening systems, but just to be doubly sure, you need to take the extra step yourself.
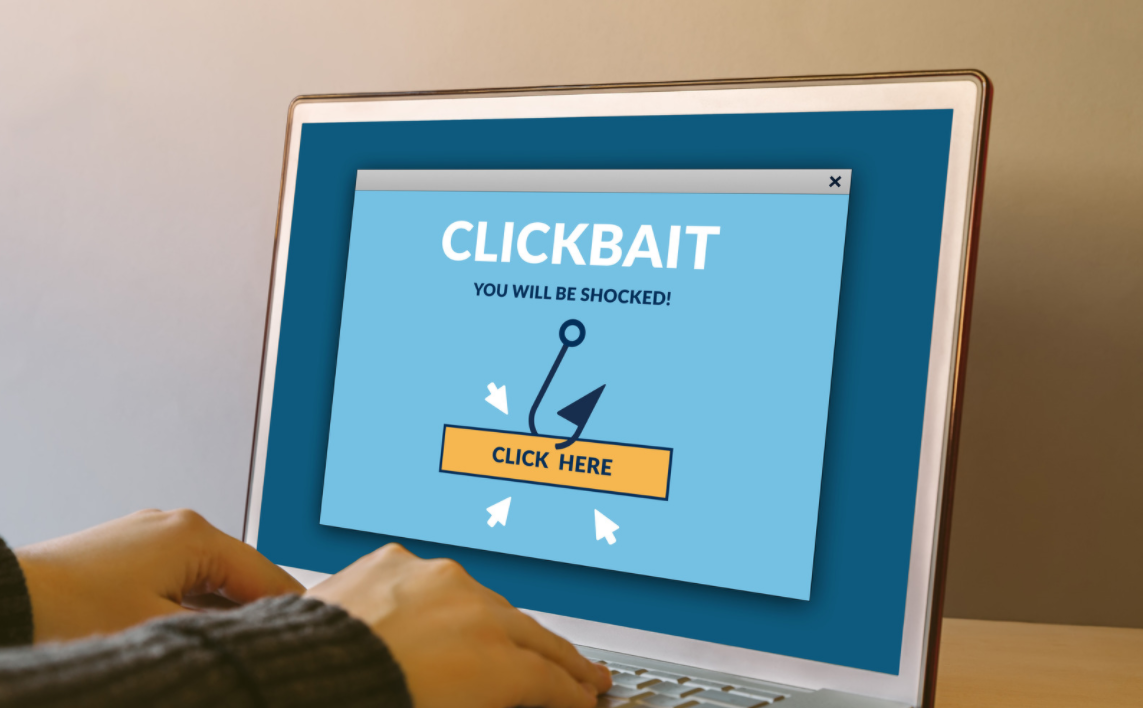
-
ClickBait Sites
Fake news and clickbait sites are abound nowadays. If you don’t want your brand to be linked to one and also gain a reputation for not being “reputable”, you have to actively filter them out.
-
Inappropriate Content
Blacklisting or Whitelisting gives you control over where your ads will appear, which means you can avoid having it show up in places inappropriate for your brand.
For instance, you may want to avoid websites that promote your competitors. Although some advertisers will try that technique, others may want to avoid that for fear of showing up in pages that talk negatively about their brand.
2. For Better Return on Investment
Getting a better ROI is the goal of all advertisers. If you know the targets that drive you conversions, then it would be a good idea to create marketing campaigns that whitelist these sources.
This ensures that you can get a better return when promoting to these targets rather than accepting traffic from just about any source. It can also mean that such a campaign will always yield positive results and more money for you even when the ad has just started running!
Be careful not to whitelist targets or sources that have too low of a traffic volume. If you do, you might end up not getting any traffic at all. Even worse, you might end up paying higher to get traffic, which means less earnings or even negative ROI.
Ad networks usually display the available volume per source, which would help in assessing how much traffic you can possibly get. Check your win rate as well. This will tell you whether you need to increase your bid or not.
3. To Save Money
Continually investing on the same campaigns without ensuring that you don’t get traffic from less than desirable sources is plain dumb.
Look at how you optimize campaigns to improve your ROI. You block some sources that are not bringing in any conversions after several thousand views, yes? If you don’t do this, then maybe you should find a professional marketing staff to take care of your campaigns, else you’re bleeding money.
You can also block sources that have a low Click-through Rate. A low CTR from a source may mean that the viewers of these sources see your ad as inappropriate or not desirable.
You can still try and create a separate ad for these sources if you think it’s the ad creative that’s the problem. It might be because of the ad headline, the image, or the ad description. Still, for the currently running ad creative, you must block non-performing sources.
4. To Reduce the Need for Testing
The list of placements that you block or accept traffic from is a predetermined one. This means either you came up with this list by testing ad campaigns before or this was given to you as a reliable list to utilize for future campaigns.
Either way, using a predefined list allows you to reduce the amount of time, effort and money spent on finding which sources will yield the best results.
5. To Avoid Competing With Yourself
Some advertisers use multiple traffic sources to get more eyes on their offer. What if you are working with an ad network who also displays ads for a specific website that you have a direct relationship with? Or what if you are running another campaign with this traffic source as whitelisted?
Since programmatic bidding states that the highest bidder will win and his ad will be displayed, chances are you might bid against yourself! You are in a lose-lose situation, if that is the case, as you will end up paying higher than you should have because there were no other competitors but yourself.
You can prevent this from happening by getting in touch with your ad traffic provider’s customer service and inform them that you don’t want traffic from that specific site. This is so that they’ll provide you with the site code and you can manually add this code to your list. If the ad network allows you to block sites based on their domain names, then that makes things easier.
6. For Compliance
If you are promoting products and services that are not your own, like if you are an affiliate marketer, chances are that there are some sites that you are restricted from publishing ads in.
This could be because the sites have given them bad ROI before, or because these are websites they work with directly and would not want to compete with their own affiliates for placements.
Some companies frequently ask their affiliates to negatively target some keywords such as their brand name, their domain name and related websites, and even some sources.
7. For Retargeting Purposes
The level of your audience’s awareness and previous interaction with your brand can determine how much they will respond to ads that will push them further along your marketing funnel.
Some ad networks allow you to collect audiences based on how they interacted with your ads and landing page.
For example, you can collect a list of audiences whose attention you caught when they clicked on your ad. You can also create a new list and collect users based on how long they stayed on your page. You can even go further and collect users based on whether they purchased from your website or not.
All this is done by recording the viewer’s user ID and adding them to a list that has a predefined set of rules.
Facebook Ads, for example, uses whitelisting in a very powerful way.
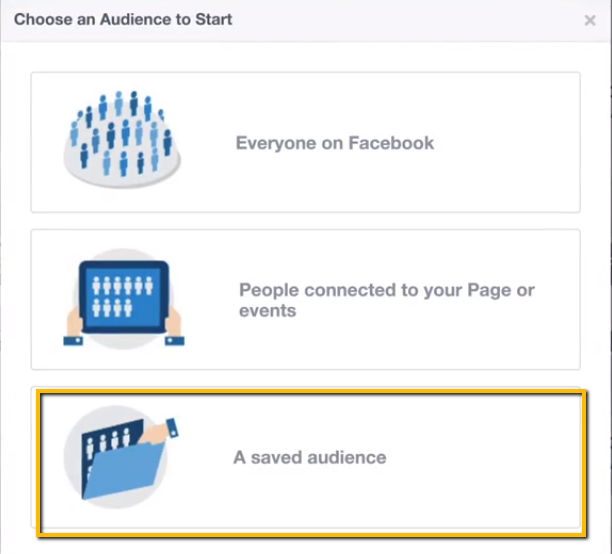
You can target people based on their connection to your page, whether they liked your page or engage in one of your posts. You can also target audiences based on a list you already have, which is, in short, a whitelist!
Aside from this, if you have already connected your Facebook Page and Ads Manager to your website, you can retarget to people who are members of the social media giant and have already visited your page, added an item to cart, clicked on checkout, and more!
That is a great example of how to use whitelist, although Facebook Ads is not the only advertising platform that can do this; in fact, almost all ad networks have this option.
In reality, you will be hard pressed to find an expert marketer that does not use whitelisting and blacklisting. This is a part of ad optimization techniques everywhere, no matter the type of traffic that you are using.
How to Create a Whitelist or a Blacklist
Now that we know the reasons why having a whitelist and a blacklist is advantageous for any marketer, what’s left is to determine how to actually create this list.
Here are some of the ways:
1. Make your own list of targets manually
If you are promoting your own product or brand, chances are you already know your product well enough. With this, there are two ways to build a list of targets:
-
Competitors
Who are your brand competitors? Do your research and find out where they promote their products. Chances are these are places (websites and apps) that they know their customers frequent. It’s highly likely that these are the same set of customers you want to get eyes on your product.
-
Interests
If you have built your marketing persona properly, then you would be able to identify where their interests lie. Search for places where these interests can be fulfilled.
Sometimes traffic networks have a list of their publishers divided into the niche categories; this can be of great help to you. You can start with this.
2. Ask Your Ad Network
Contact your account manager or any of the support staff of the traffic provider you work with. You can ask them a list of targets that you can whitelist or blacklist, based on your specific needs.
For instance, you don’t want any buzz news sites to show your ads. Tell your account manager that you want to skip these types. They will have a list ready for you.
Or also, like in #1, if you want to show ads only to apps or sites falling under a specific category or interest, then you can ask them for a list.
Some ad networks provide their whitelist data regularly through their mailing list, so make sure you subscribe to their newsletter.
3. Get Updated with the Latest Trends
Always being on the lookout for something new is a necessary habit of any marketer. For this to work, again, you have to know where your audience’s interests lie, else what trend would you look into?
Google Trends is a great place to start with this.
You can also go the manual route and list down the top 10 or 20 websites resulting from key phrases that you input that is relevant to your brand or your customer’s interests.
4. Build a List through Testing
This is the hardest yet the most reliable way to get a list to blacklist or whitelist.
Why? It is the most reliable because you can determine the quality of your list based on its performance on your own campaigns.
It is the hardest because not only do you have to spend a great deal of time and effort setting up your campaign and crafting your creatives, you also have to spend money to get traffic.
Before we start, you should know what type of target can be blacklisted or whitelisted in the traffic provider you are working with. Can you whitelist just sources, publishers, placements or websites? Checking the campaign creation page can help you determine this, as there is always a space to indicate whitelists or blacklists to add (add keywords, add websites, etc.)
So here are the steps to Blacklist or Whitelist building:
Step 1: Create a campaign.
You must have your landing page and ad creative prepared for this. Of course, even if this is to create your list, you have to make sure that you are putting your best foot forward, meaning your landing page must be of the best quality that you can come up with.
If you don’t know how to do that yet, master this guide to creating high converting landing pages. While you’re at it, why not take a look at how to write the perfect headlines?
Now back to creating a campaign. Make sure to filter your traffic properly with the right targeting, as is allowed by your traffic provider. We would recommend separating your campaign test according to country, but you can go as broad as you like.
Step 2: Let your campaign run.
Running this campaign with enough budget for several days can give you enough data to work with. Millions of ads are displayed to internet users every single day, so a good amount of data to work with would be in the thousands or tens of thousands of views. It depends on the ad format you chose, really.
For instance, if you use native advertising, your views should reach at least in the tens of thousands, as this is one of the ad formats with the most viewership. If you use push ads notifications, a couple of thousands of clicks through can be good enough. Any less than a thousand is not enough to work with.
Step 3. Analyze your data.
Now that you’ve reached the traffic level needed, it’s time to evaluate your data. Head over to your tracker, or at least your ad network if you don’t have a tracker.
Click on your campaign and have a look at the stats. Filter them out one by one by any of the following:
- Geolocation (country)
- Publisher ID/source ID
- Website name or code
- ISP
- Keywords
- Placements (if you chose all placements available)
Basically, filter them based on what can be blacklisted/whitelisted in your network.
For Blacklist
Arrange the data based on the amount of views or clicks your ad received, with the highest at the top. Look at the targets that delivered impressions but did not warrant any click or conversion.
Mark them or list them down if you have to. These items will be added to your blacklist.
You must be able to determine the amount of traffic that you receive that you believe should already have received a click or conversion.
For Whitelist
This time around, arrange the data based on the amount of clicks or conversions you received, with the most clicks/conversions at the top.
Again, list down these items that drove the intended action you want. This will comprise your whitelist.
Step 4. Continue Gathering Data
At this point, it’s up to you whether you want to keep the original campaign running, or to start over with a new one. You can even split test your ads.
If you want to continue with your current campaign, you can already add your blacklist by pausing non-performing targets. You can also place emphasis on targets that bring you conversions/clicks by increasing your bid on these targets alone.
Depending on the network you are working with, this strategy can be done automatically by setting rules. This is called auto-optimization.
How to Apply a Blacklist or a Whitelist to Your Native Ads
By this time, you already have your list handy. How to apply this then? If you are running native advertising, here’s how to do that based on the native advertising platform that you are using.
Outbrain
In order to create a blacklist or whitelist within Outbrain, you must first create an audience segment. If you have a pre-made list, you can upload it to Outbrain.
If you will be collecting your own list by running a campaign in Outbrain, you should first create an Audience Segment with specific rules. You can create several audience segments that you needed, whether they be for whitelisting or blacklisting. There are also different kinds of segmentation in Outbrain for you to choose from, depending on your goal.
The rules you set can be anything from receiving a click to having a specific keyword in the URL, or any other rule available.
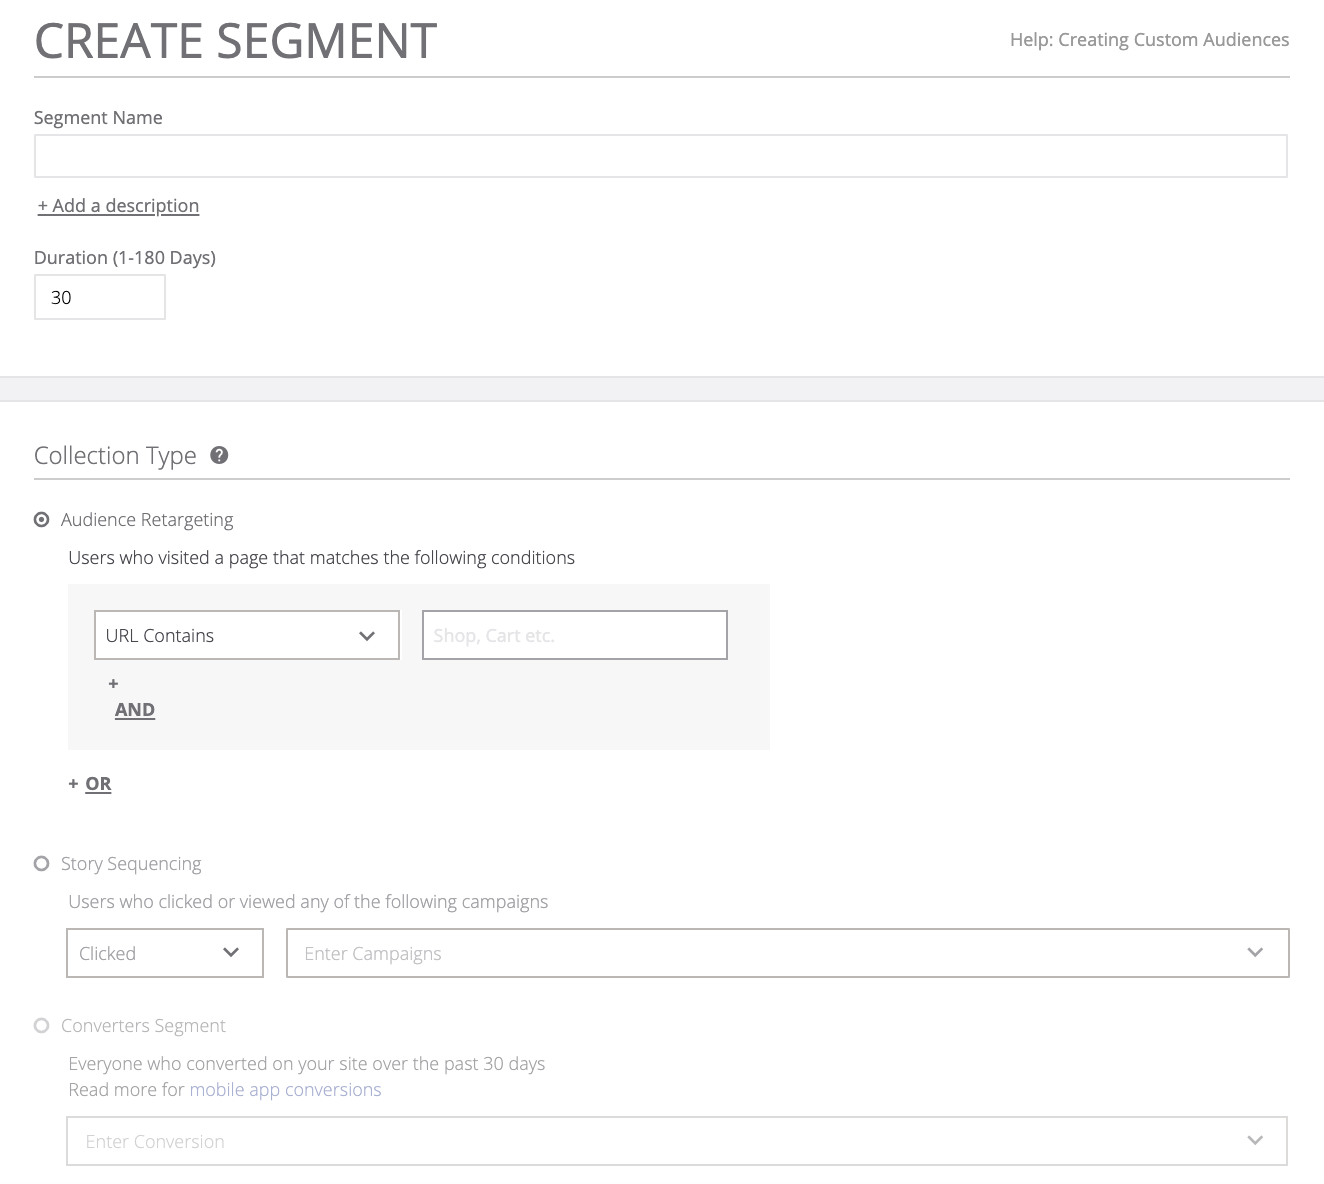
It is essential that you install Outbrain’s pixel on your landing page for the network to properly monitor the actions the user performs.
Outbrain recommends that you reach at least 100,000 users in this collection in order for the segment to have enough volume to work with. Once you’ve set this up and have collected enough data, then you can start using your audience segments in your campaigns.
You can choose the segment you want to include (whitelist) or exclude (blacklist) in the audience targeting section during setup.
Taboola
Taboola has a great way to allow advertisers to easily identify targets that perform well based on their conversion rates. In order for this to work, you would need to setup conversion tracking first.
Once you run your campaign, you can create audience segments just like in Outbrain. If your account has enough data and you’ve created your lists, you can immediately choose audience types (campaign clickers, pixel based, and audience segments) during campaign setup.
The audiences you can create can be used sitewide, which means you can easily assign the audience list you built to any campaign you create.
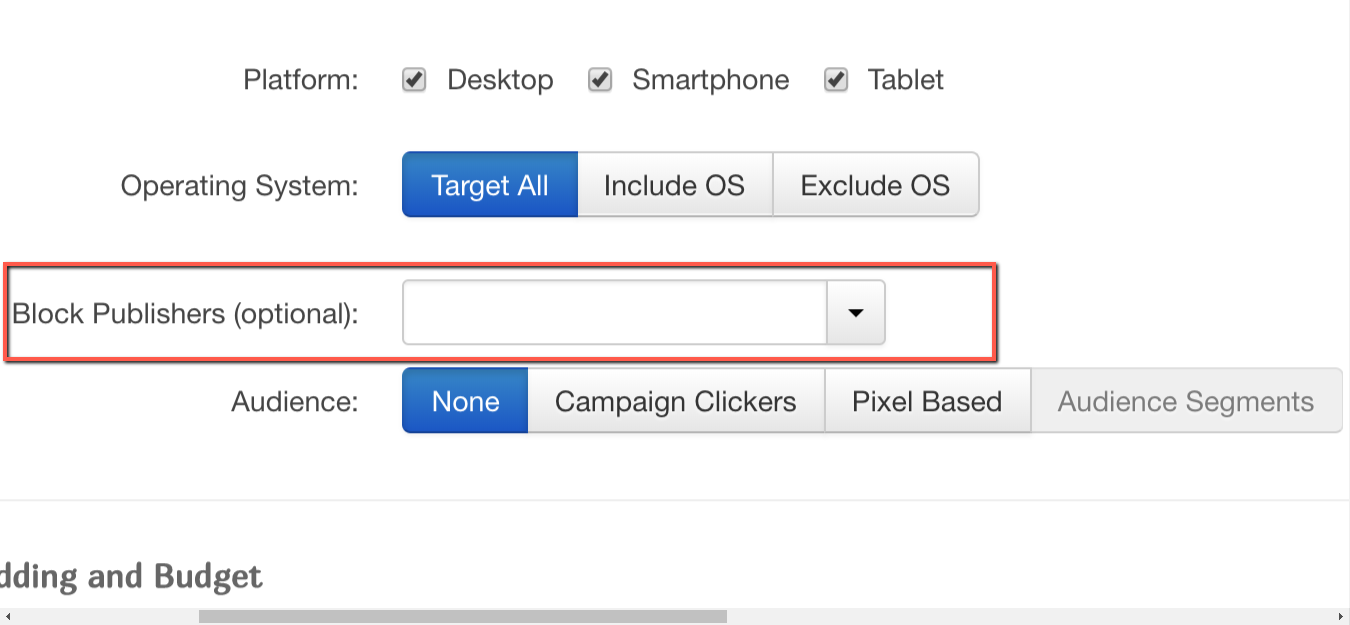
You can blacklist publishers before your campaign even starts by adding the publisher code in the designated space when creating your campaign.
It is even possible to blacklist some users by adding them to a suppression list. A suppression list can be created because the users within the list have already converted and you don’t want to advertise to them anymore, or simply because you are spending a lot on these users but you doubt that they will actually turn into customers.
RevContent
This ad network allows multiple types of targets to be filtered out or in. The following can be whitelisted or blacklisted in Revcontent:
- Brand or websites
- Placements or widgets
- Interest categories or topics
- Geolocation (country, city or even zip code)
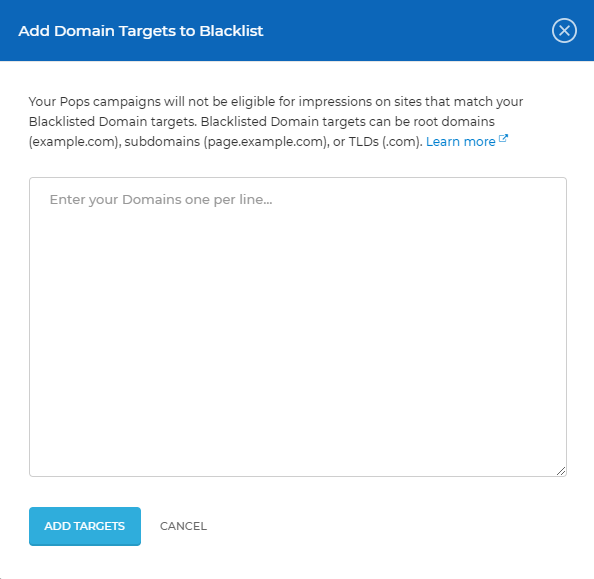
Unlike other traffic providers, adding a blacklist or whitelist cannot be immediately done during campaign creation in RevContent. You actually need to come back to the campaign after finishing up and visit the Advanced Targeting page.
In the Targeting tab, you can modify which channels can bring you traffic by toggling each item on or off.
To blacklist placements, go to the Widget Optimization tab and input the widget IDs that you've learned are not working for you. For blacklisting on the specific campaign you are working on, choose Campaign Level Blacklist. If you want your list to be used for all your campaigns, choose Account Level Blacklist.
On the other hand, if you want to whitelist channels, websites, placements and more using a list you already have, you can contact your account manager and have him set everything up for you.
Content.ad
When creating and applying whitelists or blacklists (they call this “block list”) in Content.ad, it is necessary for you to use a third party tracker. This is so you can quickly identify underperforming and over-performing sources based on the conversions you get as monitored by your tracker.
You must append a couple of Content.ad macros, specifically the campaign ID and the domain ID, at the end of your ad URL for your tracker to record information about your traffic.
As you would have noticed, only the domain ID can be blacklisted or whitelisted in this network.
Once you have established your list, simply visit the Advertising tab within your Content.ad dashboard and create either a white list or a block list. Make sure to name your lists properly so that you can easily identify them during campaign creation.
Keep in mind that a maximum of 50 Domain IDs can be added to a list at a time.
Now when using your lists, you can either assign the campaign to the list, or assign the list during campaign setup. While you can include as many campaigns to one list, you can only use one blacklist or whitelist per campaign.
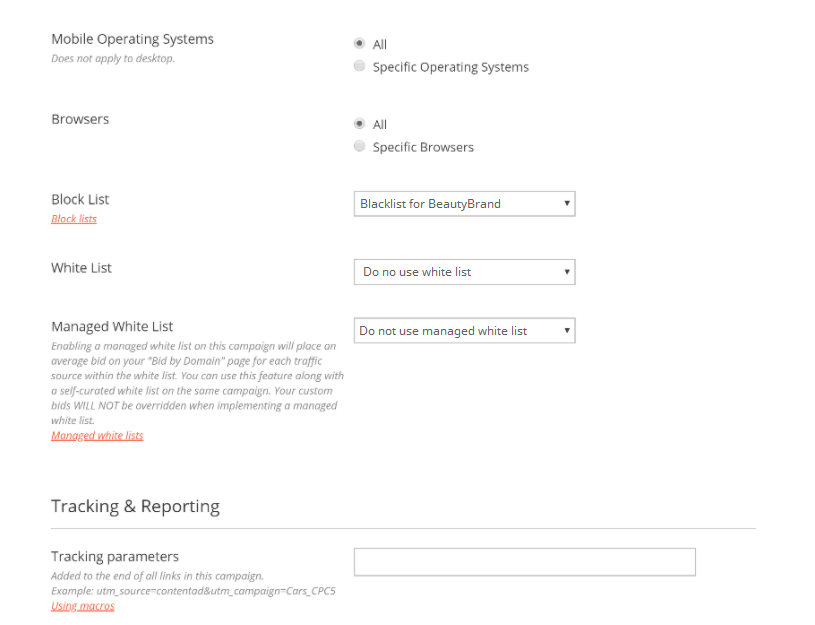
Aside from the white list that you create on your own, Content.ad regularly sends its advertisers Managed White Lists, which comprise of domain IDs that have been performing well as per their evaluation.
You can choose one Self-curated White List and one Managed White List at the same time in one campaign.
Yahoo Gemini
Site blocking is possible within Yahoo Gemini, and the process is done when creating a new campaign. You can find this option under General Information, under Define Your Audience section.
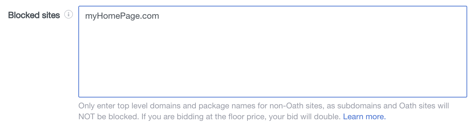
Simply copy and paste the site domain names, making sure it’s one domain per line, and that’s it! If you are also running traffic from apps, you can block some of them by placing the app package name
When it comes to whitelisting traffic sources, you would have to create a custom audience. There are six types of custom audiences you can use in Yahoo Gemini, and these are:
- Audiences from websites
- Audiences from customer list
- Audiences from your app
- Audiences from email lists
- Lookalike audiences
- Conversion rule audiences
The last one is what you can build if you run a whitelist (or blacklist) building campaign.
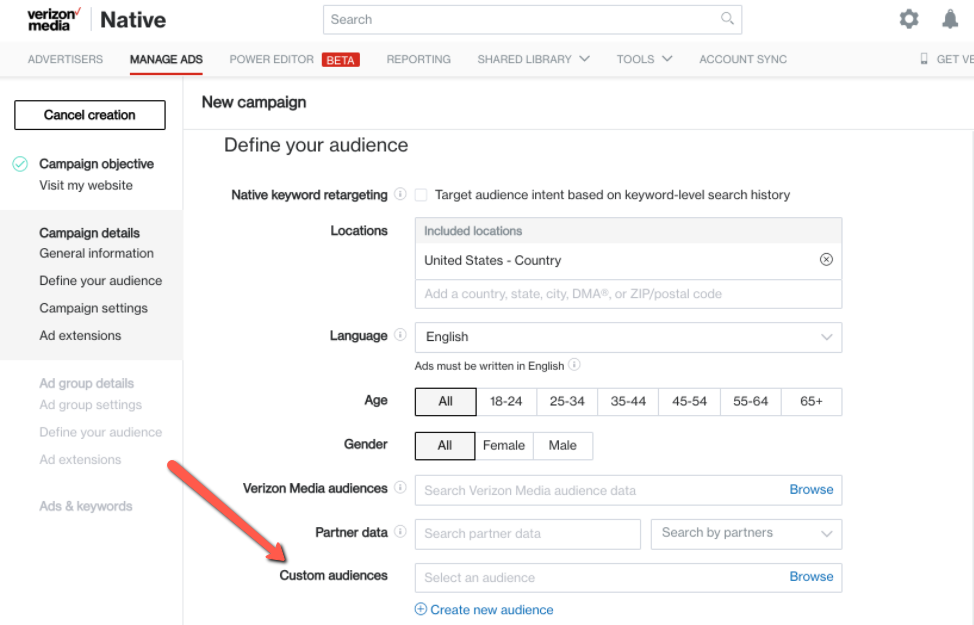
Yahoo Gemini has an extensive Audience Management tool that can help you properly segment your audiences and use them according to your campaign needs.
Brax
We may not be a traffic provider, but we do manage native advertising campaigns, so it would make sense for us to have a blacklisting and whitelisting feature in our system.
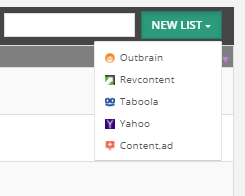
When you visit your Brax dashboard, head over to the Targeting Lists on the left panel.

Click on the New List button and choose the ad network you will be using this list for. Your choices are Outbrain, RevContent, Taboola, Yahoo Gemini, and Content.ad.
Name your list appropriately and start adding the sites for this list.
You can also add targets to your list by looking into the campaigns you are already running within Brax. Simply go to the campaign, visit the Sites tab, select the items you want to add to your list, then click the “+” button.
Choose a list from the pop-up that appears, and then save.
To view all the sites added in a list, visit the Targeting List section again and choose the list you want to check. You can view and edit the list to your satisfaction, or even duplicate and download it.
You can then use these to block sources or publishers by heading over to the campaign and adding the list in the block publishers or block sites section, whichever applies based on the ad network.
To use these for whitelist, add the list to the Targeting List portion within the campaign settings. This is possible for Outbrain, Taboola, and Yahoo Gemini.
Key Takeaways to Whitelisting and Blacklisting
These two techniques, whitelisting and blacklisting, are great methods to improve your Return on Investment. Doing this ensures that you are not just wasting your money away, but are actually allocating your money to the right sources.
Mastering how to determine which targets to include and which ones to block is a feat in itself, and is what separates an expert marketer to a novice one. So what are you waiting for? Don’t be left behind and start mastering how to blacklist and whitelist today!
If you need assistance in setting up your native ads campaigns or filtering out undesirable targets, don’t hesitate to reach out to us at love@brax.io. If you want to look around our system and test Brax’s capabilities, we have a 15-day trial just for you! Sign up today.

